
This documentation was created by Joy Victor who had reached out about collaborating on this project. It is incredibly detailed and thorough, and I can’t thank her enough for all of the time and effort that she has put into it. Follow Joy on Twitter and LinkedIn
GET STARTED
Tableau Drawing Tool is a free tool directly available in Tableau that lets you create custom designs by tracing images or drawing “freehand” directly in Tableau.

With this tool, you can create custom shapes and incredible images. The Tableau Drawing Tool allows you to express your creativity on Tableau Public or Tableau Desktop.
This documentation gives you a walkthrough on how to use this tool and its features for your work.
Other Resources:
- Tour the workspace
- Desktop Instructions
- Public Instructions
TOUR THE WORKSPACE
The Tableau Drawing Tool is hosted on Tableau Public. To access the tool, click this link: https://public.tableau.com/app/profile/brian.moore7221/viz/TableauDrawingTool/DrawingTool
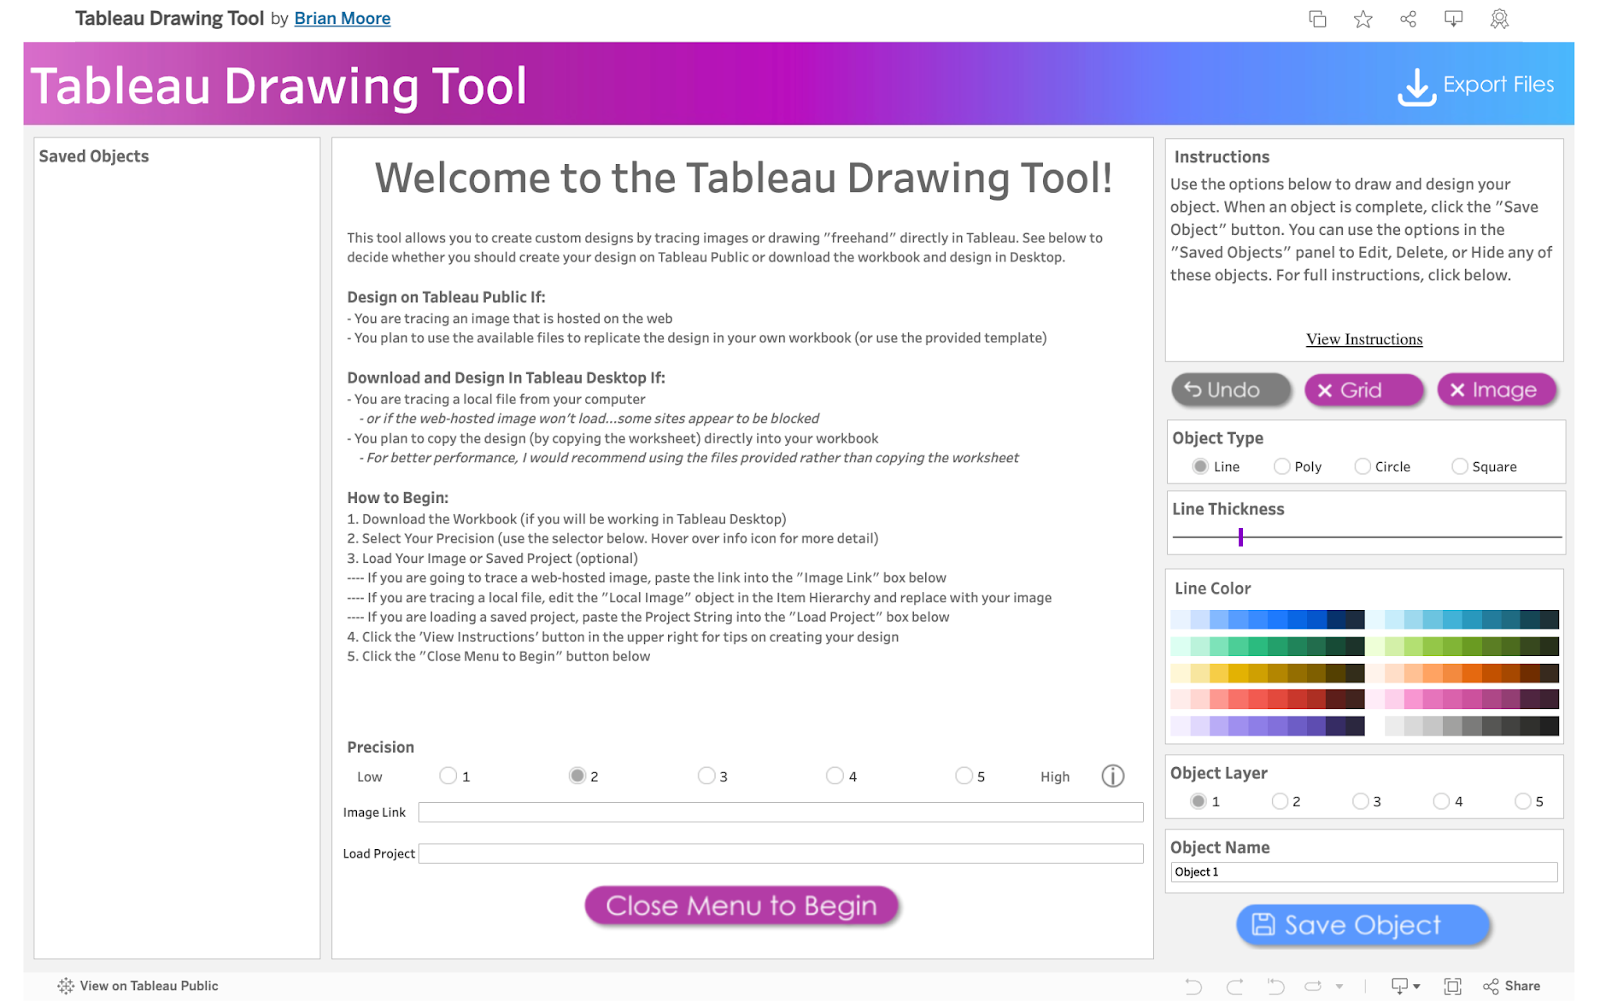
Upon clicking the link, you are welcomed to the exceptional Tableau Drawing Tool. The workspace consists of different sections with lines, objects, buttons, and much more.
The Workspace
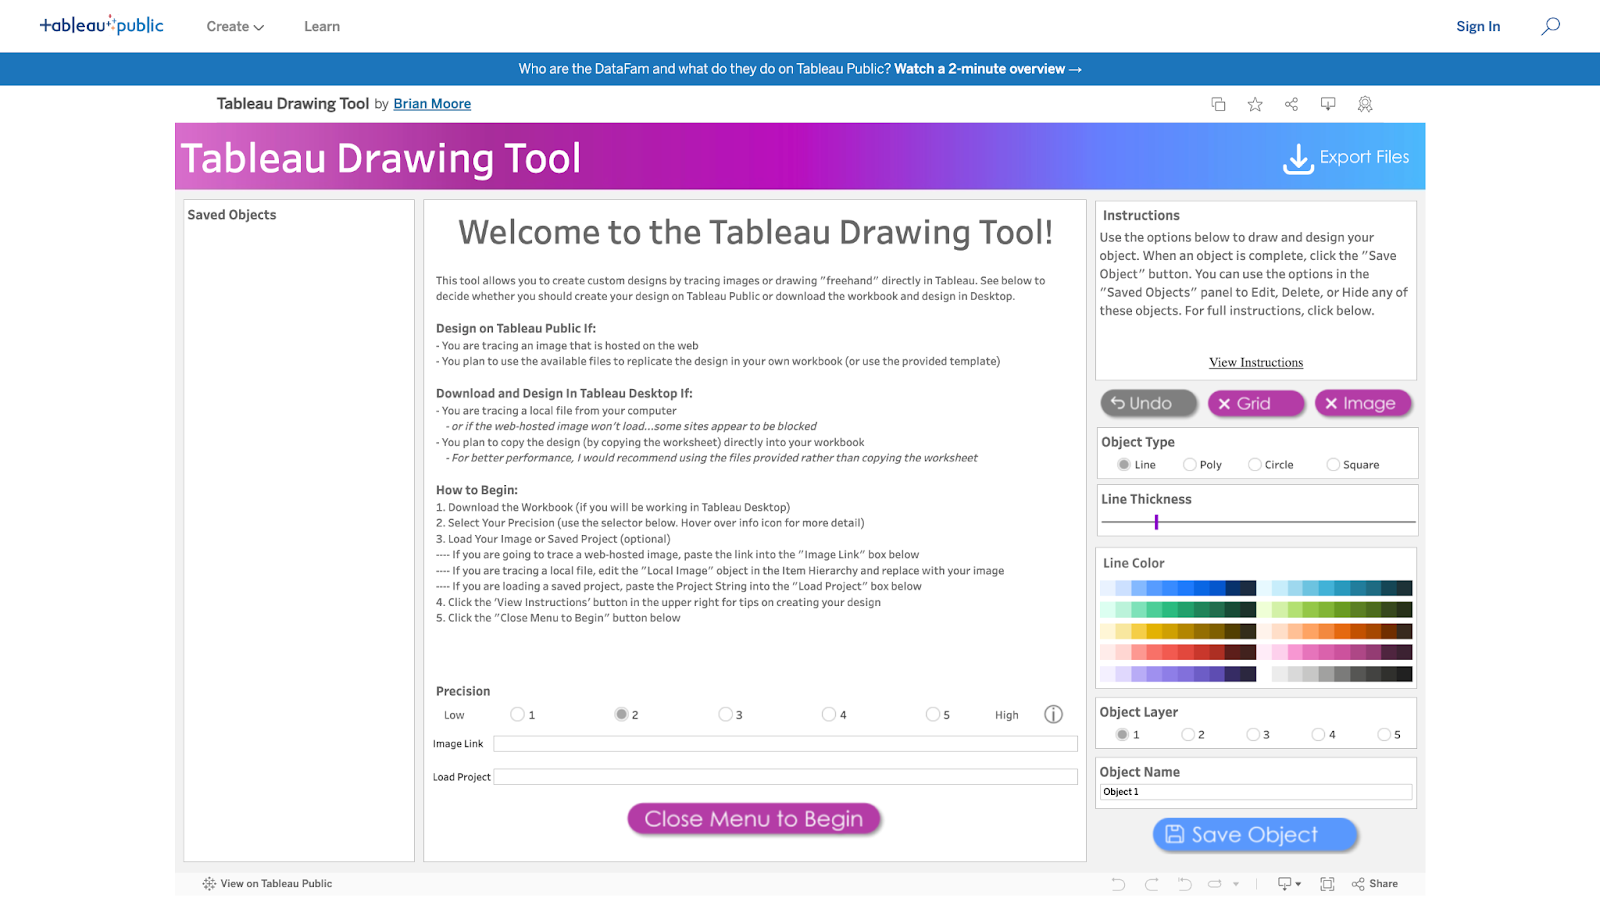
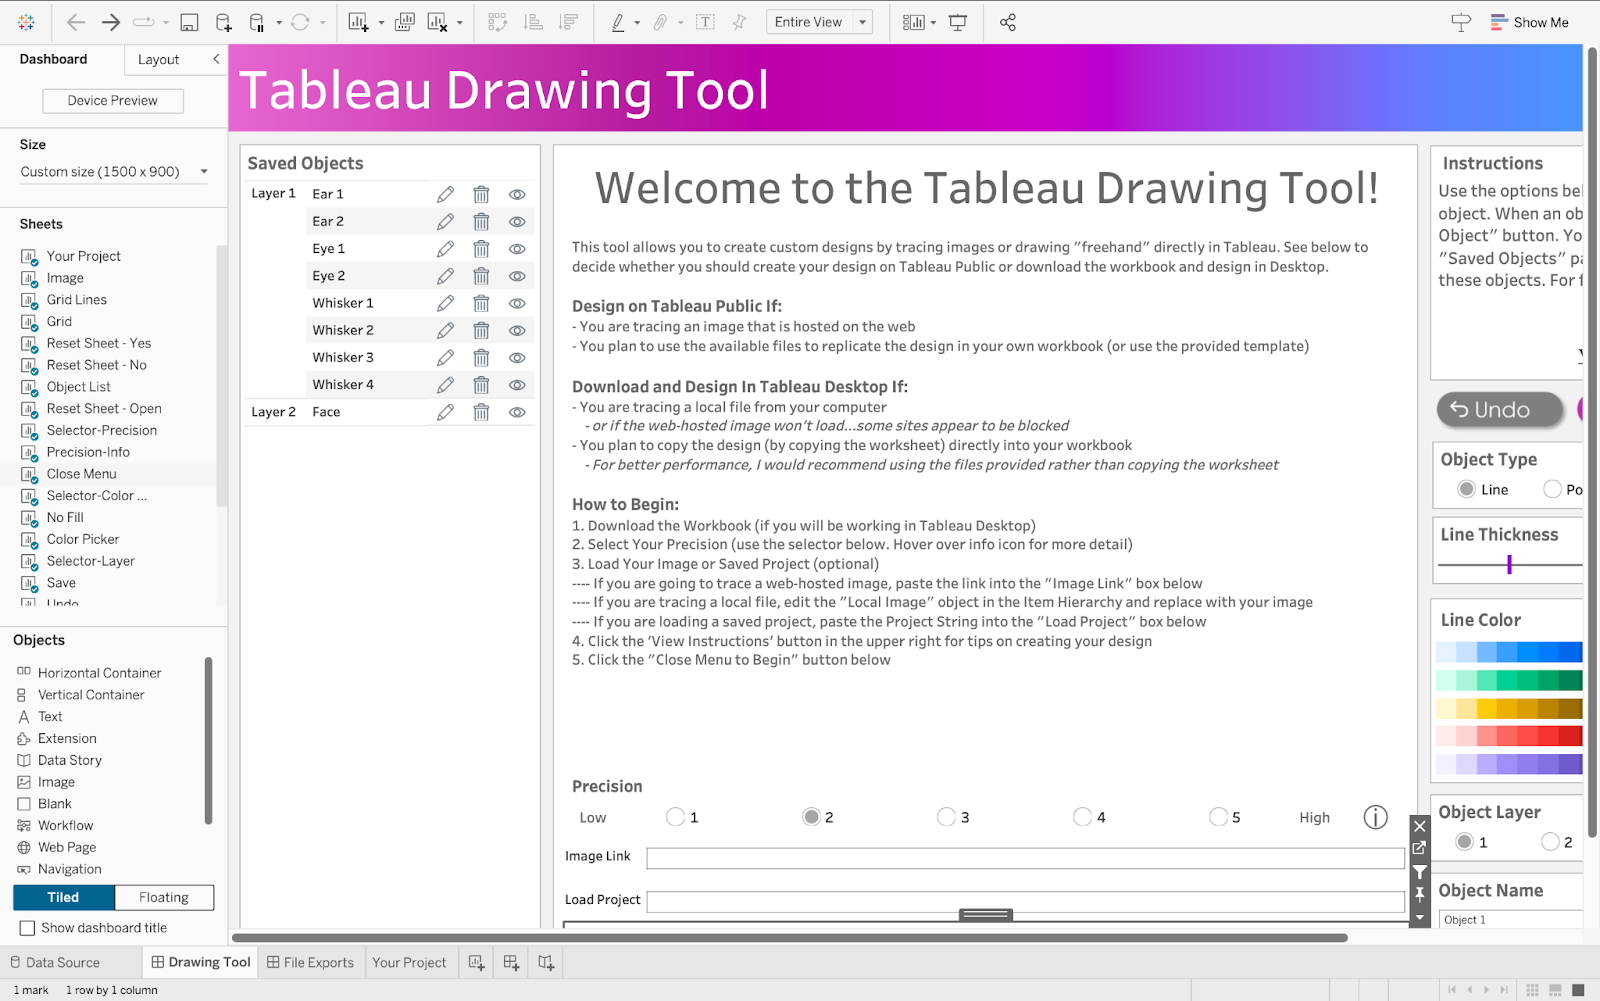
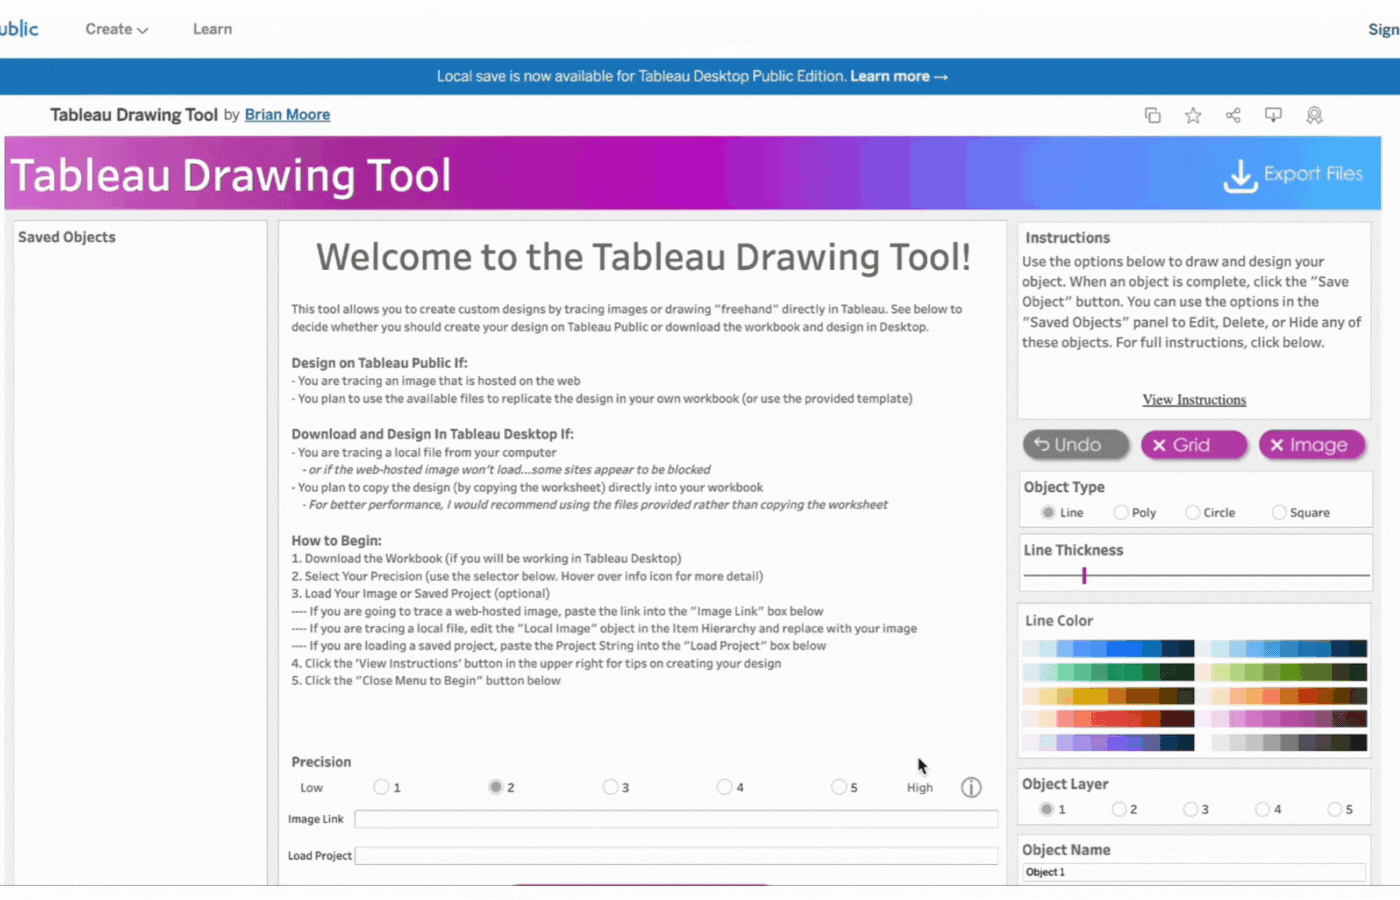
The workspace UI consists of three panes: Saved Objects, Menu, and Instructions.
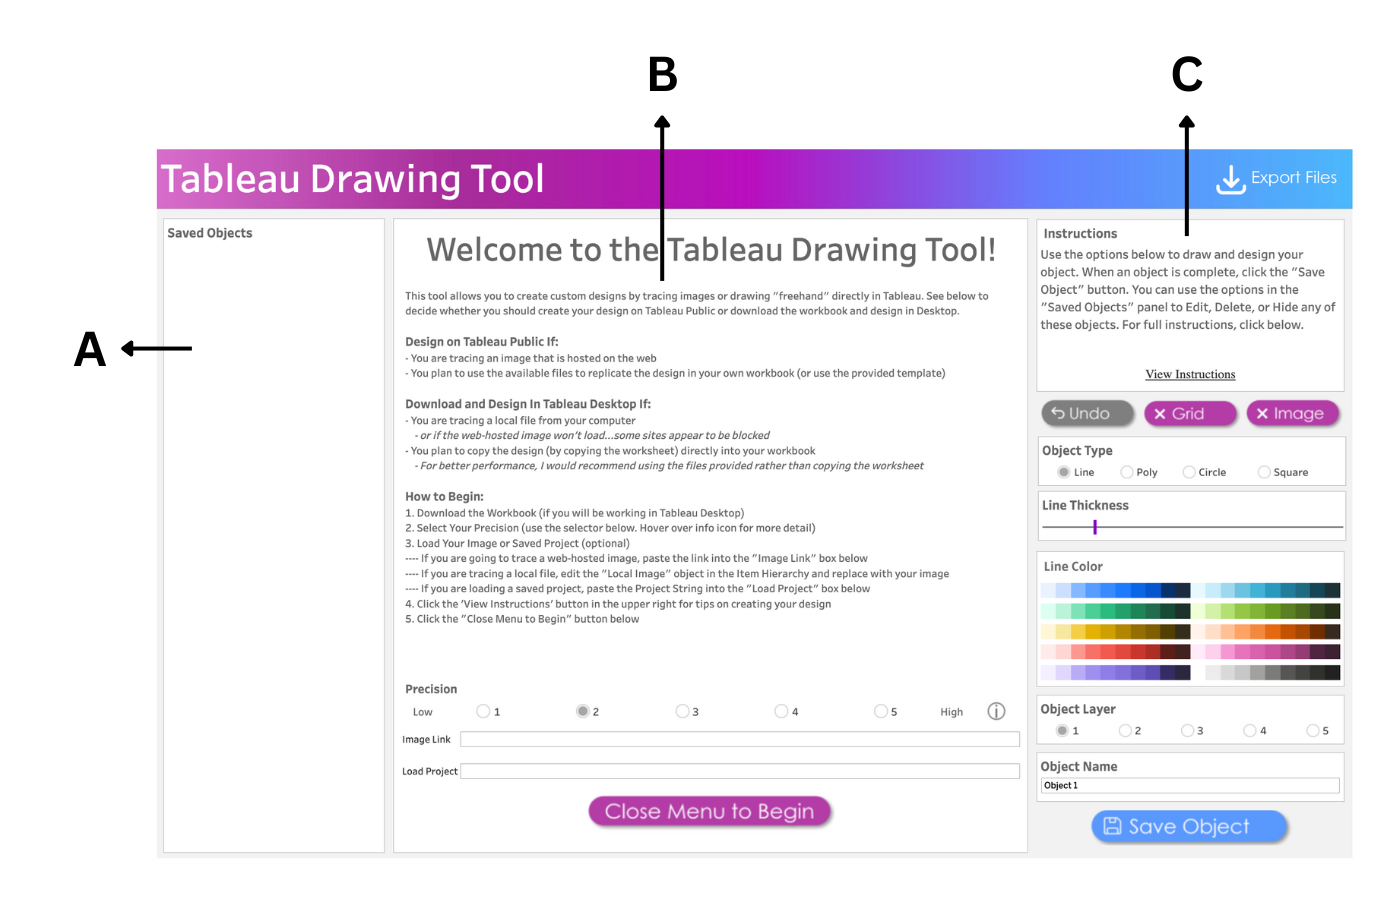
- Saved Objects: Images and custom shapes (anything designed on the tool) are referred to as Objects. Objects appear on this pane and can be edited, hidden, or deleted.
- Menu: The menu pane contains directions on how to design based on Tableau Desktop or Tableau Public. Click the “Close Menu to Begin” button to open the Drawing Canvas.
- Instructions: This contains brief instructions on how to draw and design objects. You can click “View Instructions” to view more instructions or “Hide Instructions” to hide. The image below shows the display of the workspace when “View Instructions” is clicked.
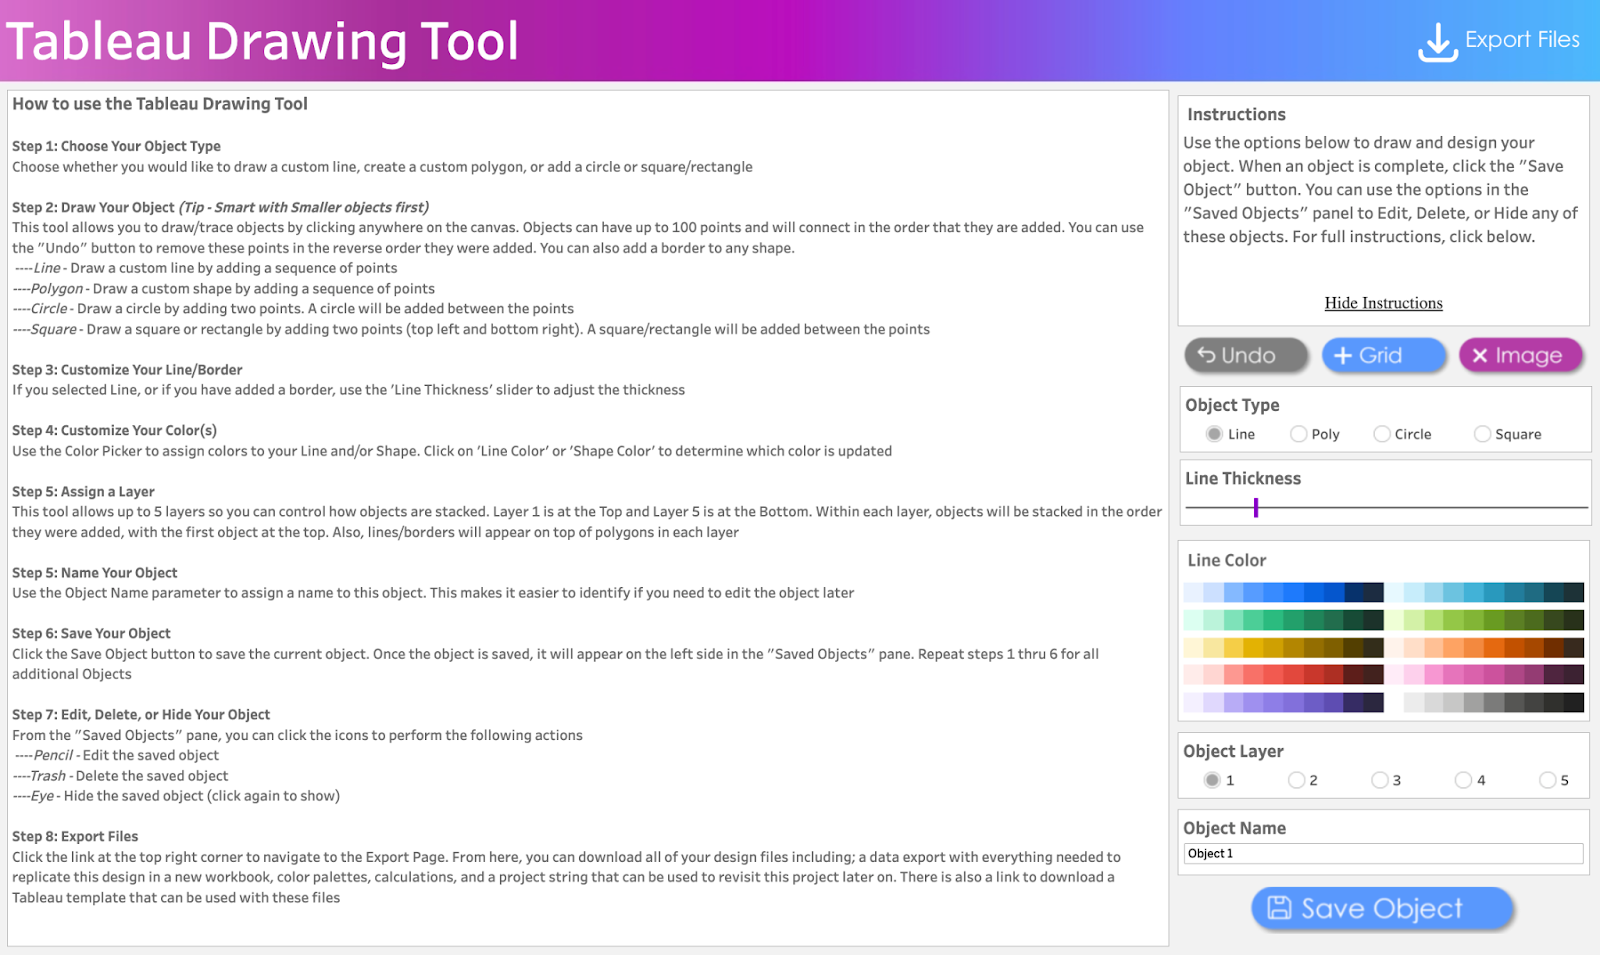
Workspace Options
The workspace options give flexibility to draw and design objects of different shapes and sizes.
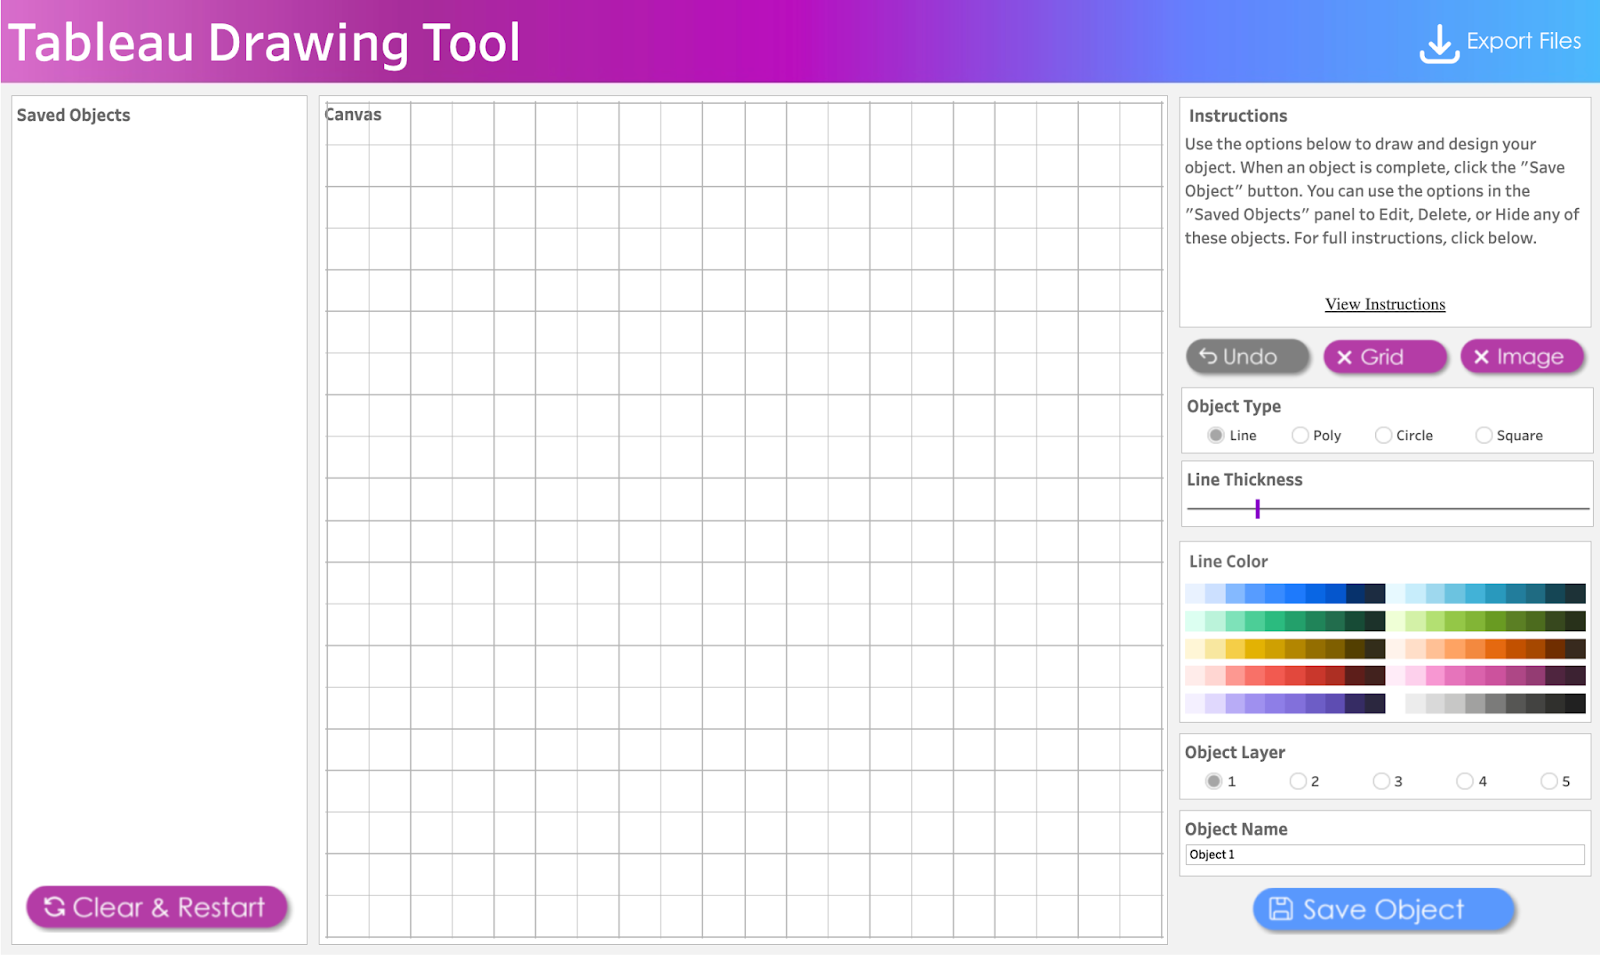
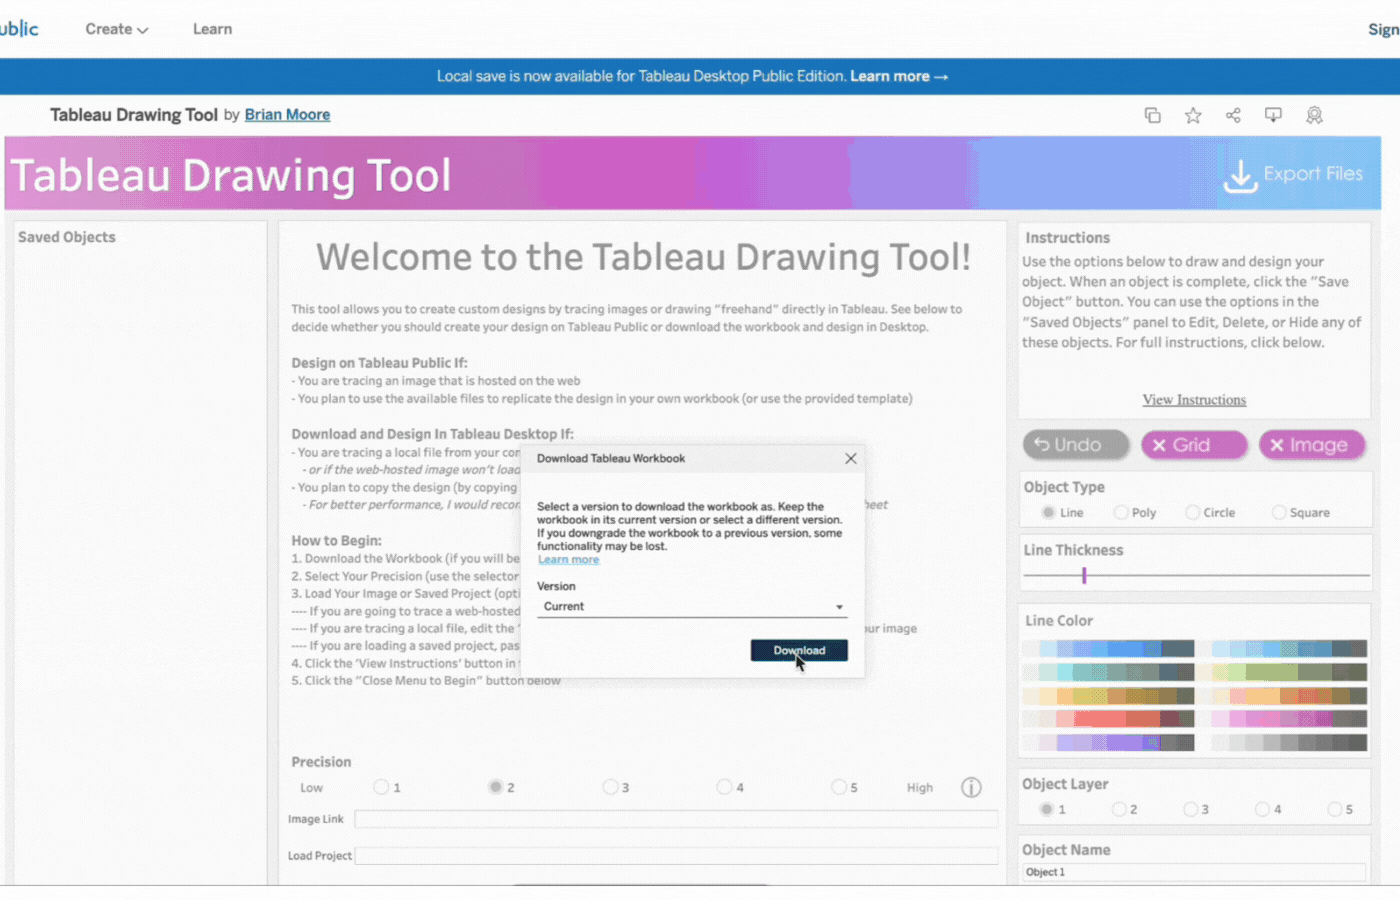
 | Export Button: Downloads all your design files including color palettes, calculations, and project string. |
 | Undo button: Reverts action. |
 | Grid Button: Displays or hides gridlines. Gridlines are also adjustable by pixels. |
 | Image Button: Displays or hides image to be traced. |
 | Save Object Button: To save the current object. Once the object is saved, it will appear on the left side in the Saved Objects pane. |
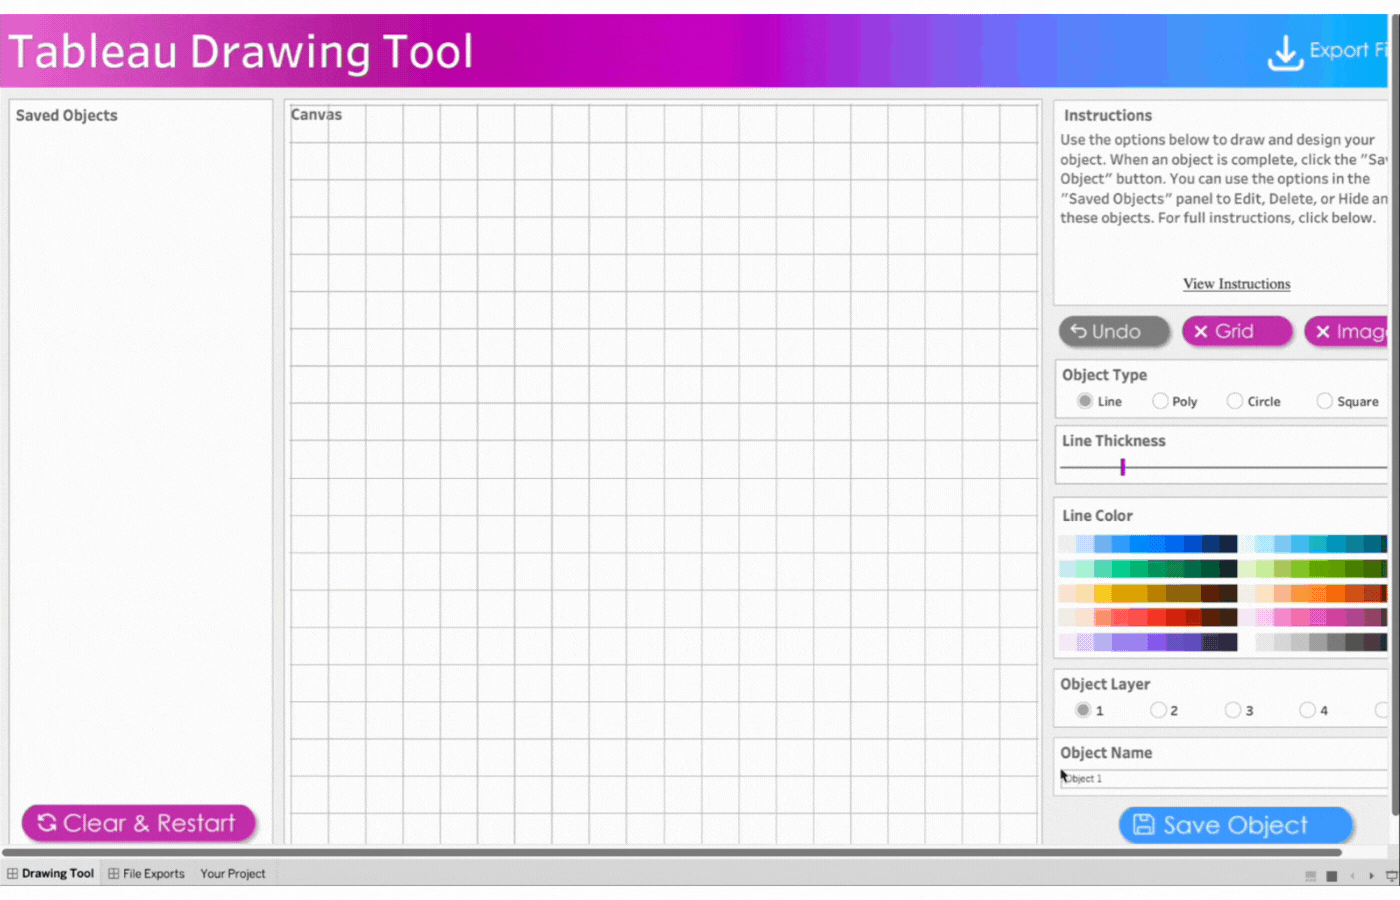
 | Close Menu to Begin Button: This opens the drawing Canvas and closes the menu. See Image 3 |
| Clear & Restart Button: This button appears after the Close Menu to Begin Button is clicked. It is used to clear and restart the drawing as the name implies. | |
| Canvas: This pane opens up to replace the Menu Pane(B). All drawings will be done on the Canvas pane. | |
 | Object Type: Specifies the geometric object to be drawn. Line, Poly(Polygon), Circle, and Square are the available selection options. |
 | Border: This option appears when either Poly, Circle, or Square is selected. It is a visible line that marks the boundary of the shape. Select Yes to display the border or No to hide it. |
 | Line Thickness Slider: Use the slider to adjust the thickness of a line or border. |
 | Shape Color and Line Color: Use the Color Picker to select colors for your Line and/or Shape. Click on Line Color or Shape Color to choose colors. Select No Fill to remove colors. |
 | Object Layer: The Tableau Drawing Tool allows up to 5 layers to control how objects are stacked. Layer 1 is at the Top and Layer 5 is at the Bottom. Objects are stacked in the order they were added, with the first object at the top. |
 | Object Name: Assign a name to each object you create. This makes it easier to identify if you need to edit the object later.Tip: Assign the name before creating the object. |
| Precision: This option determines how precise the clicks are when drawing an object. It utilizes an invisible grid with selectable points. The higher the precision, the more points there are available. However, higher precision slows down performance. Info Icon: Hover over the info icon for more details on the precision.The Lowest Precision option utilizes roughly 4,000 points. The Highest Precision option utilizes roughly 20,000 points. Tip: Use low precision for free drawing basic shapes and/or objects that have mostly straight lines.Use high precision for small objects with a lot of curves. | |
| Image Link: Paste a link in the Image Link box to trace a web-hosted image. | |
| Load Project: Paste the Project String (See Page X) If you are loading a saved project, into the “Load Project” box below. |
HOW TO DRAW WITH TABLEAU PUBLIC
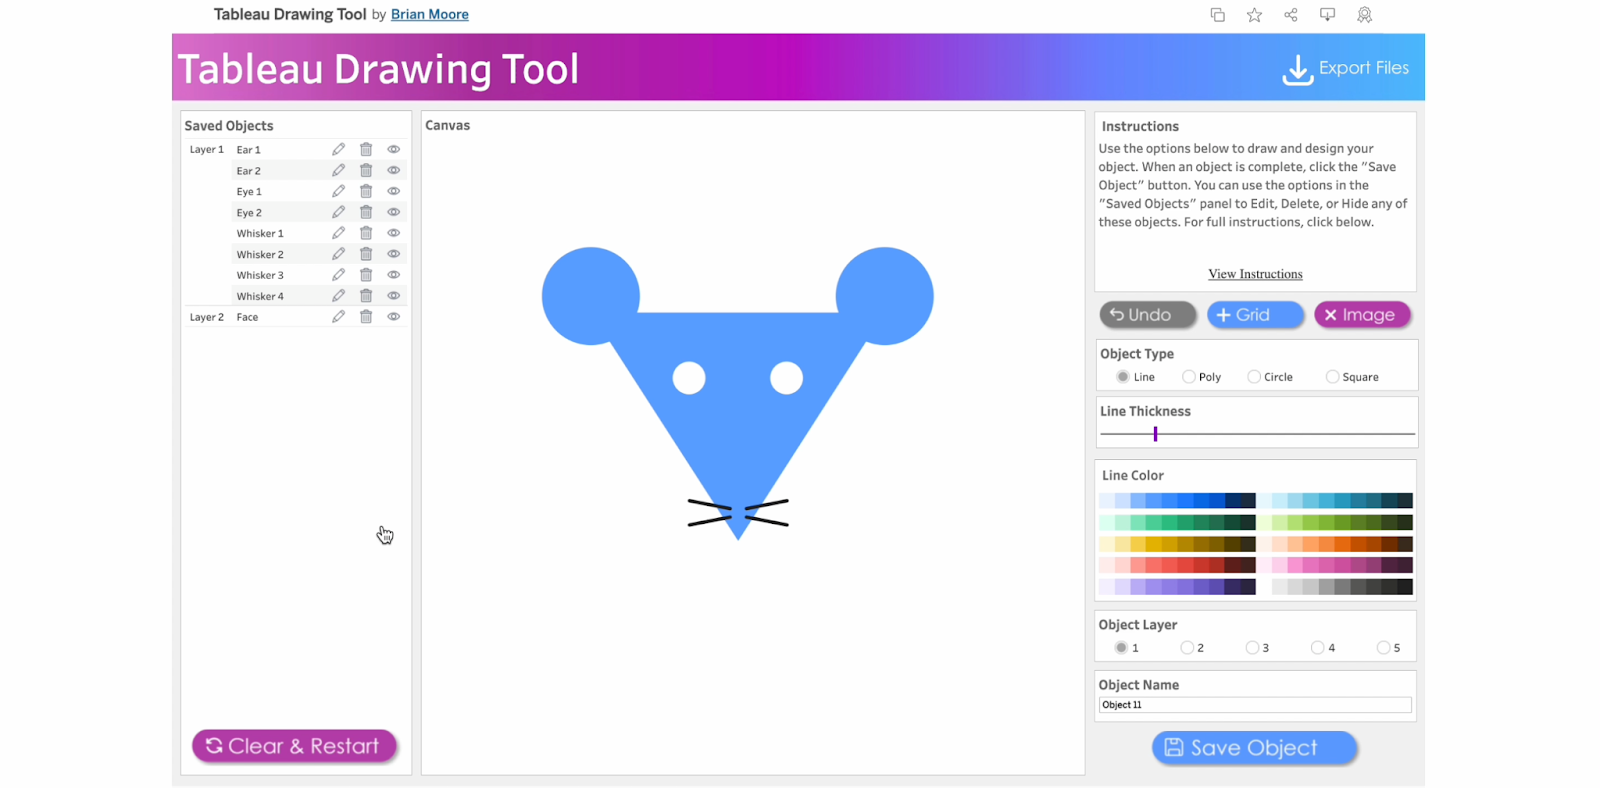
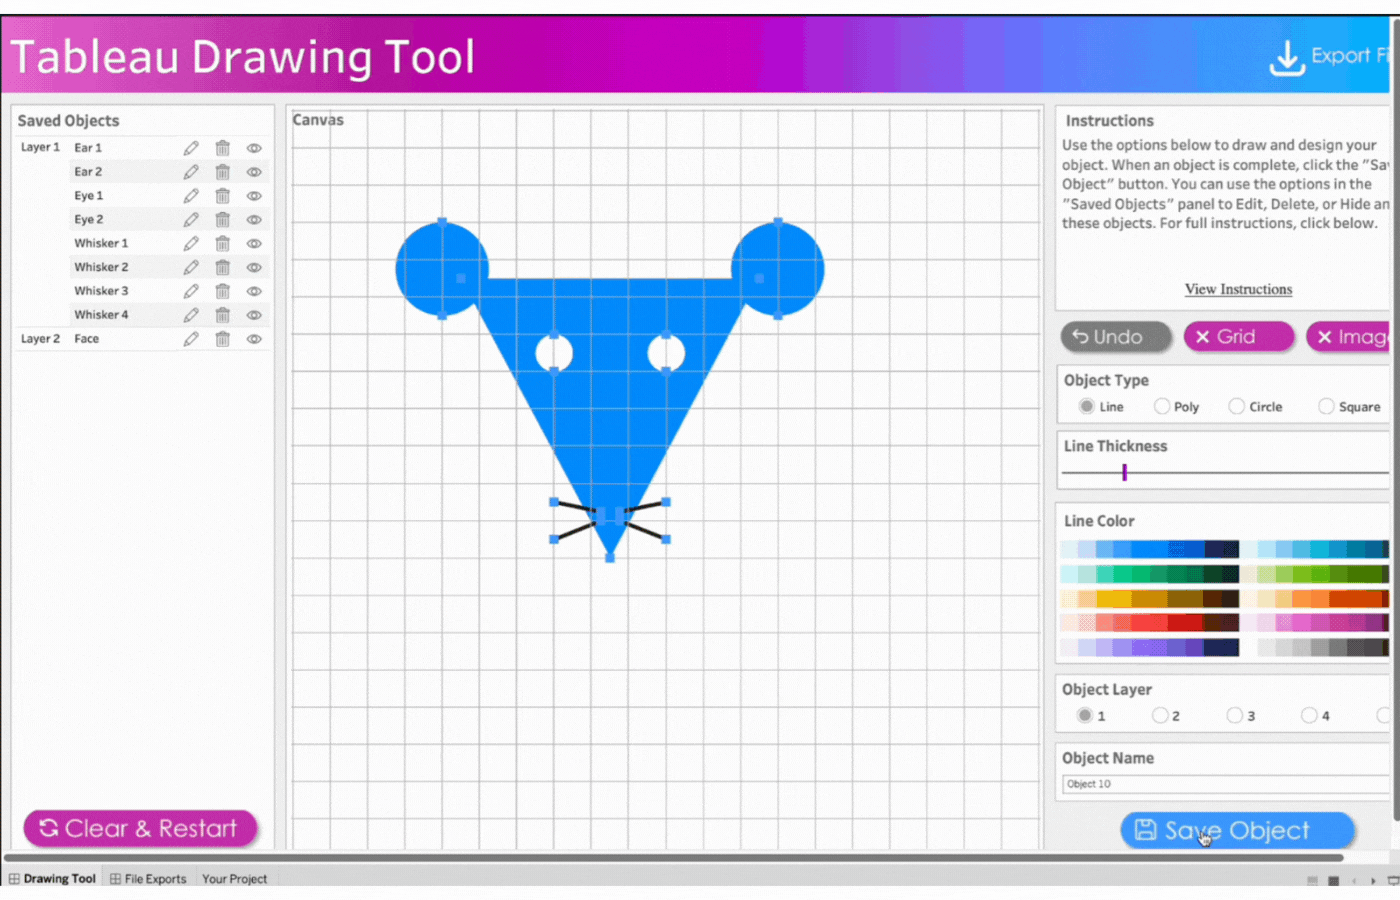
This section of the documentation gives you a step-by-step guide on how to draw a little mouse using Tableau Public.
NB: This section only covers how to draw using Tableau Public. More sections in this documentation include:
- How to Draw with Tableau Desktop
- How to Export Images
- How to Save and Resume Your Work
- How to Trace a Web-hosted Image
STEPS
- Close the Menu to open the drawing Canvas and begin
- Create the first ear
- Create the second ear
- Create the face
- Create the first eye
- Create the second eye
- Create the whiskers
- Export the project by clicking the Export button
Click this link to access the Tableau Drawing Tool: https://public.tableau.com/app/profile/brian.moore7221/viz/TableauDrawingTool/DrawingTool
1. Close the Menu to open the drawing Canvas and begin
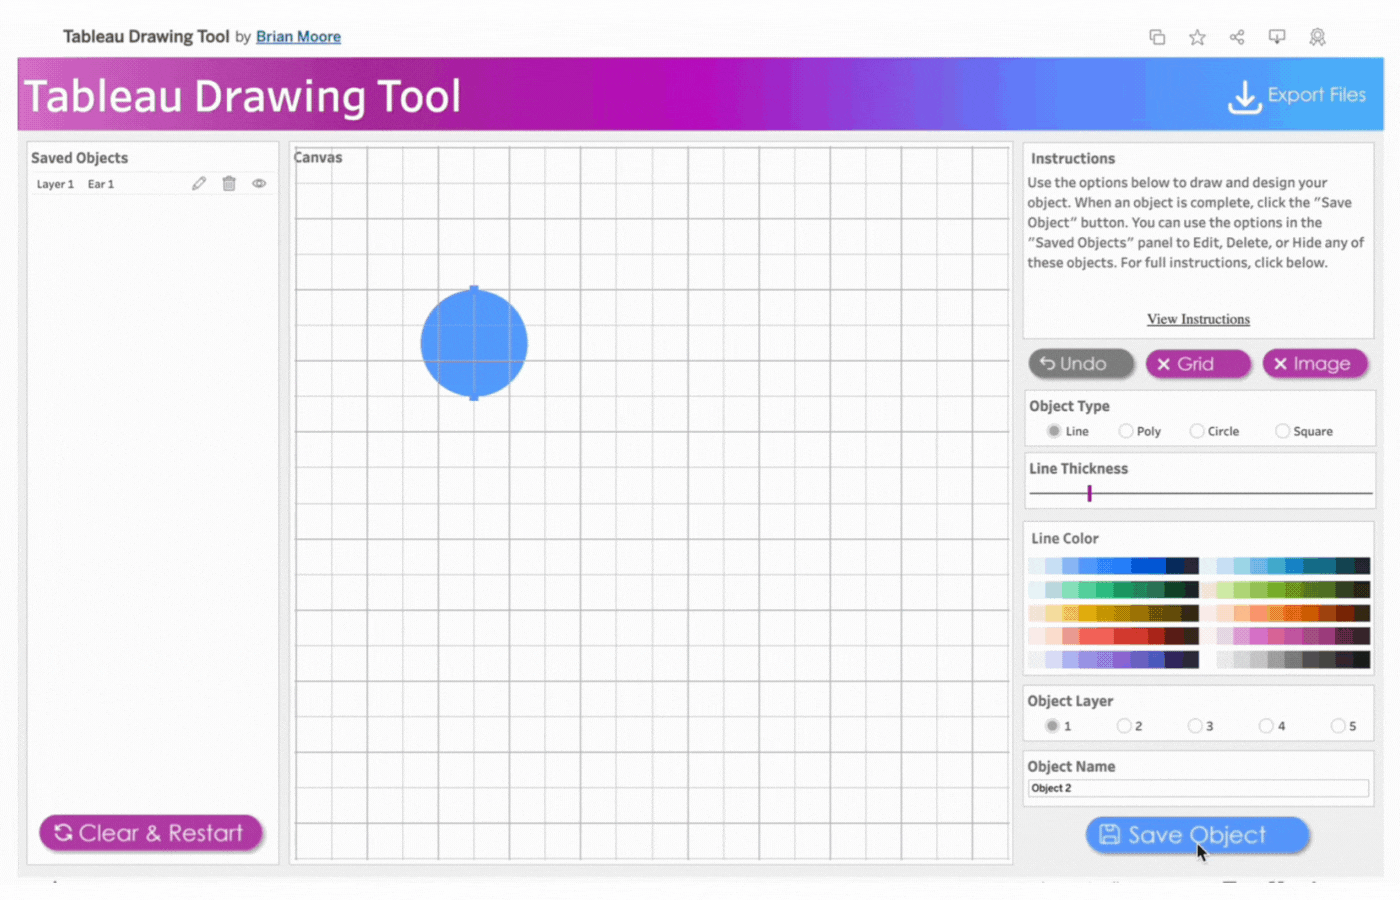
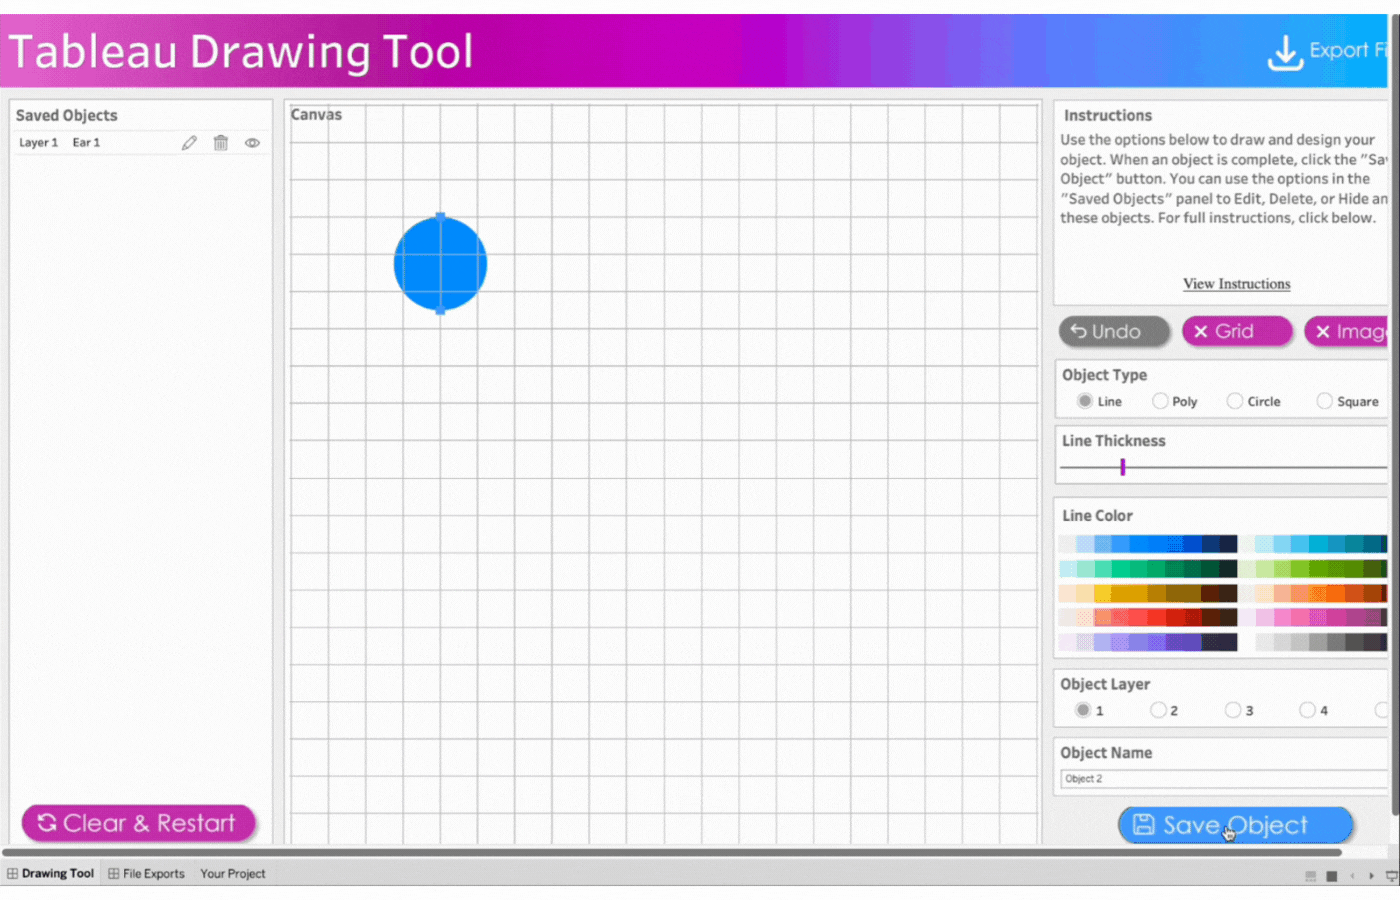
2. Create the first ear
- Name the first object, Ear 1
- Click object type, Circle
- Click two points to determine the size of the circle
- Remove the border
- Select the color, blue
- Save the object

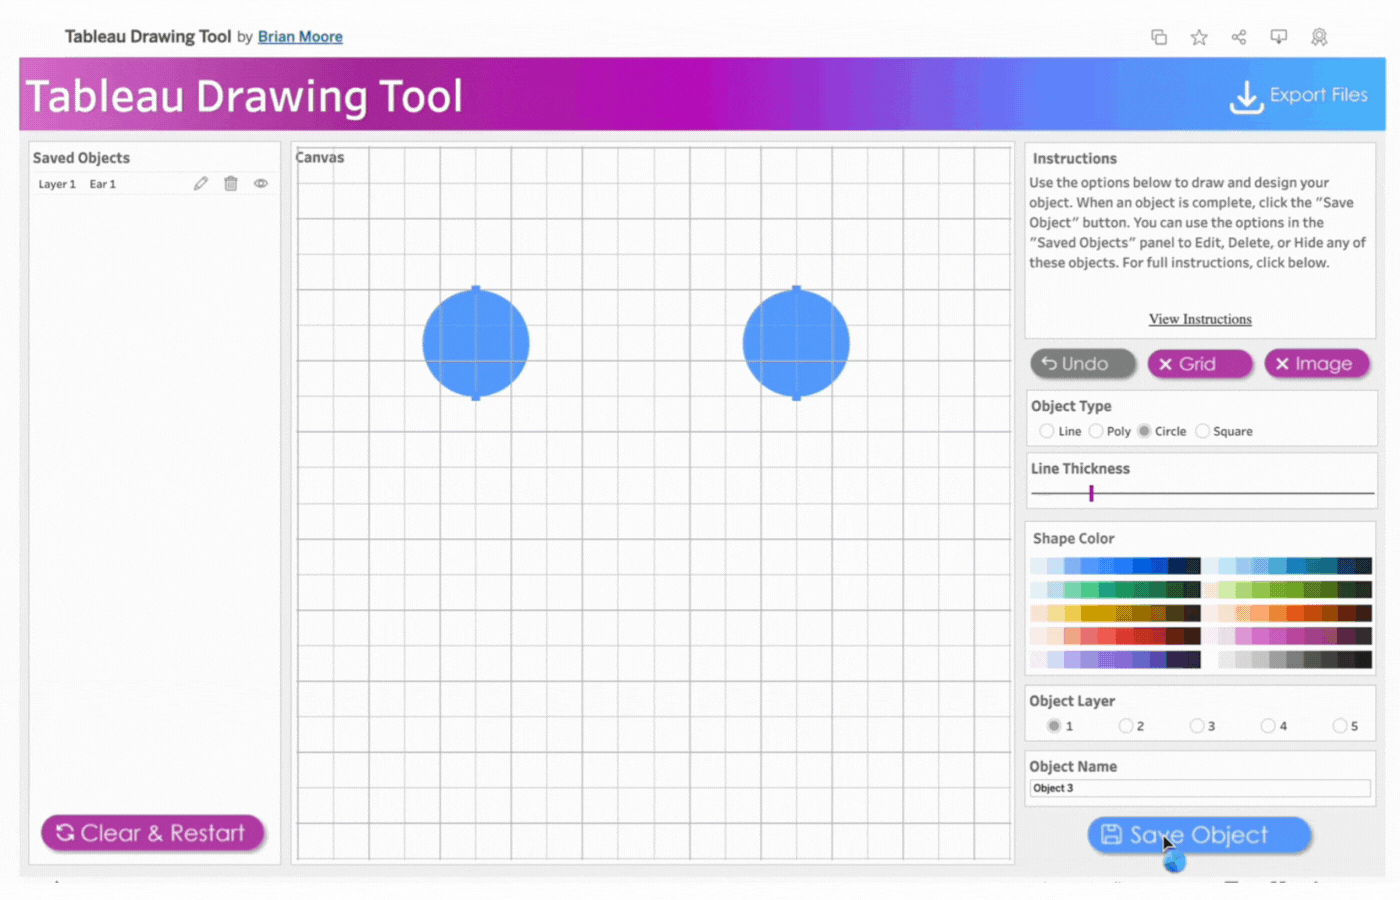
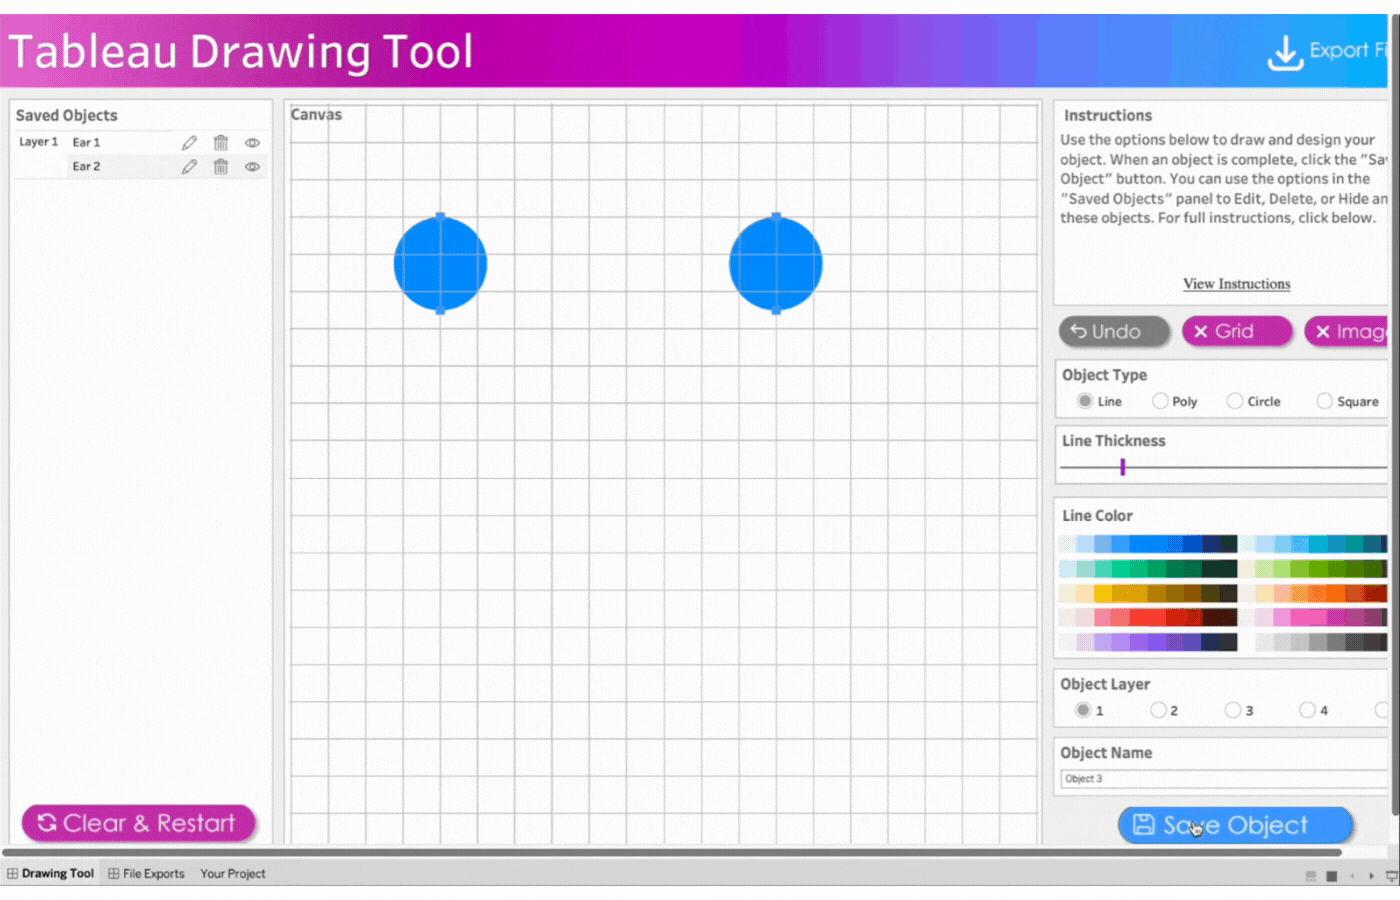
3. Create the second ear
- Name the object, Ear 2
- Repeat the process above for the second ear
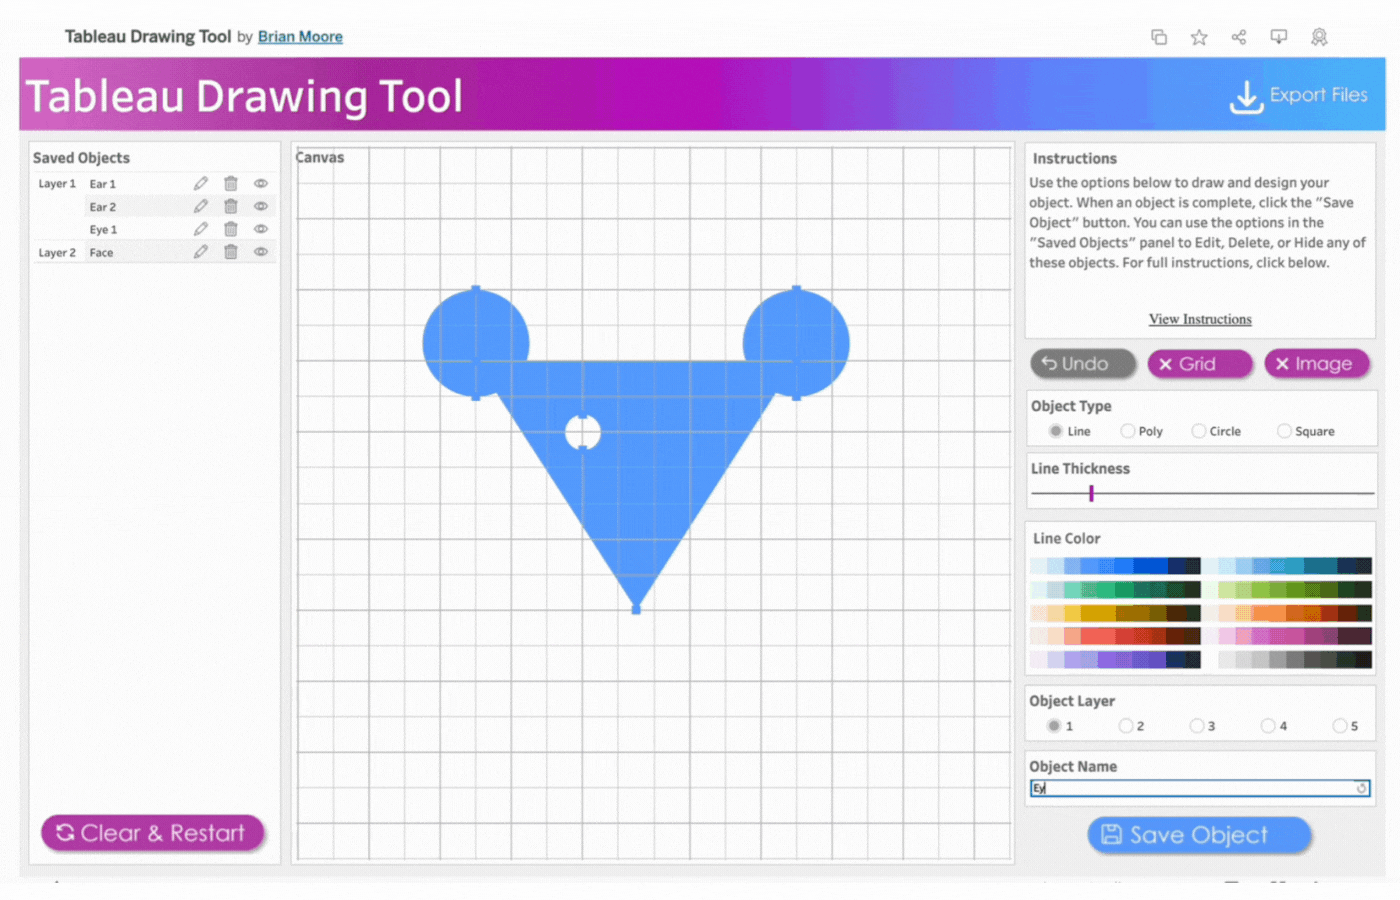
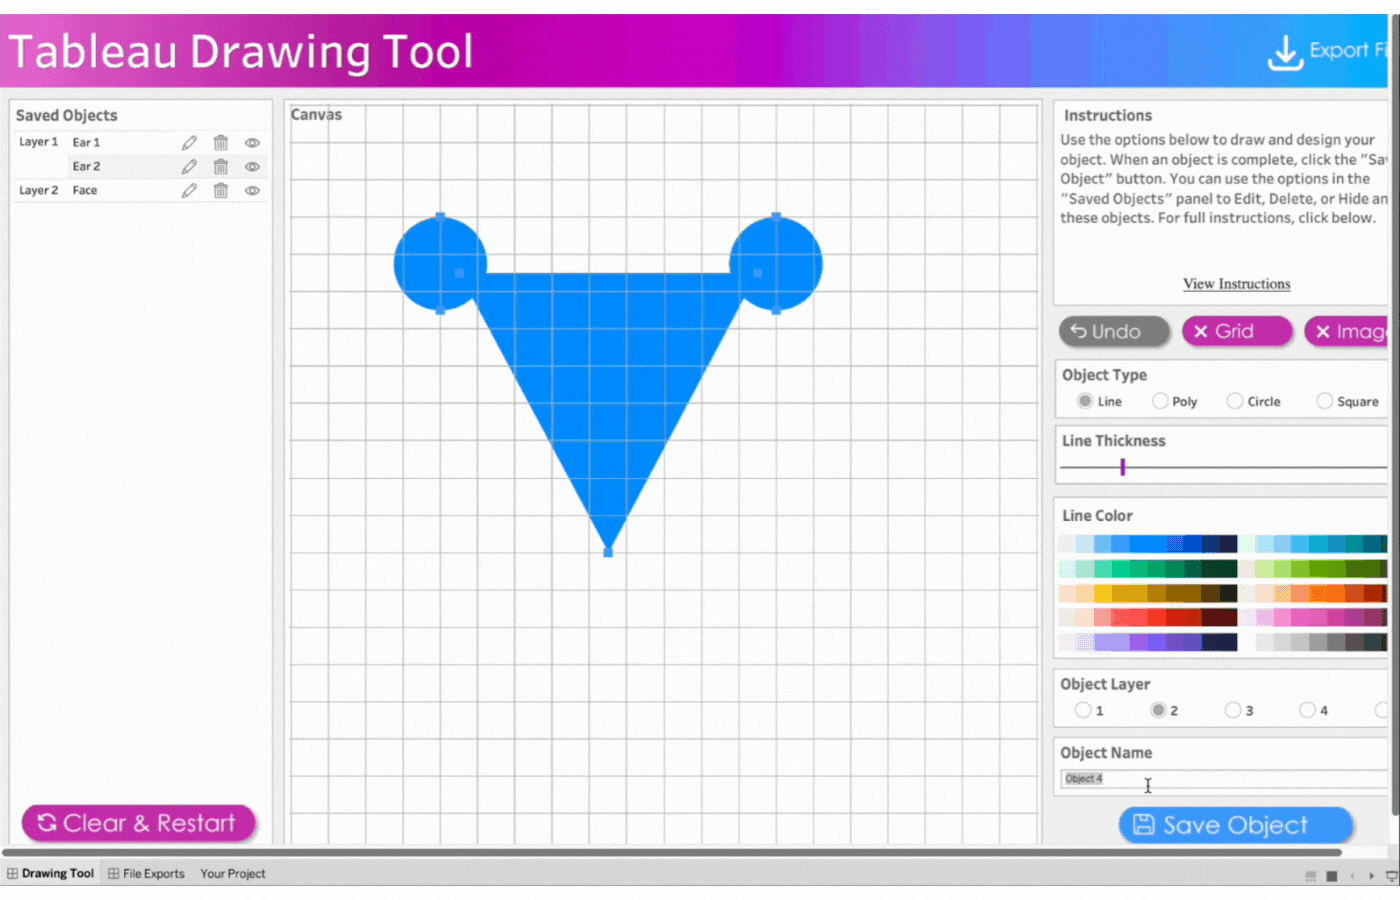
4. Create the face
- Name the object, Face
- Select Object Layer 2 to send the triangle behind the circles (ears)
- Click object type, Line
- Click three points to form a triangle
- Change object type to Polygon by clicking on Poly
- Remove the border
- Select the color, blue
- Save the object
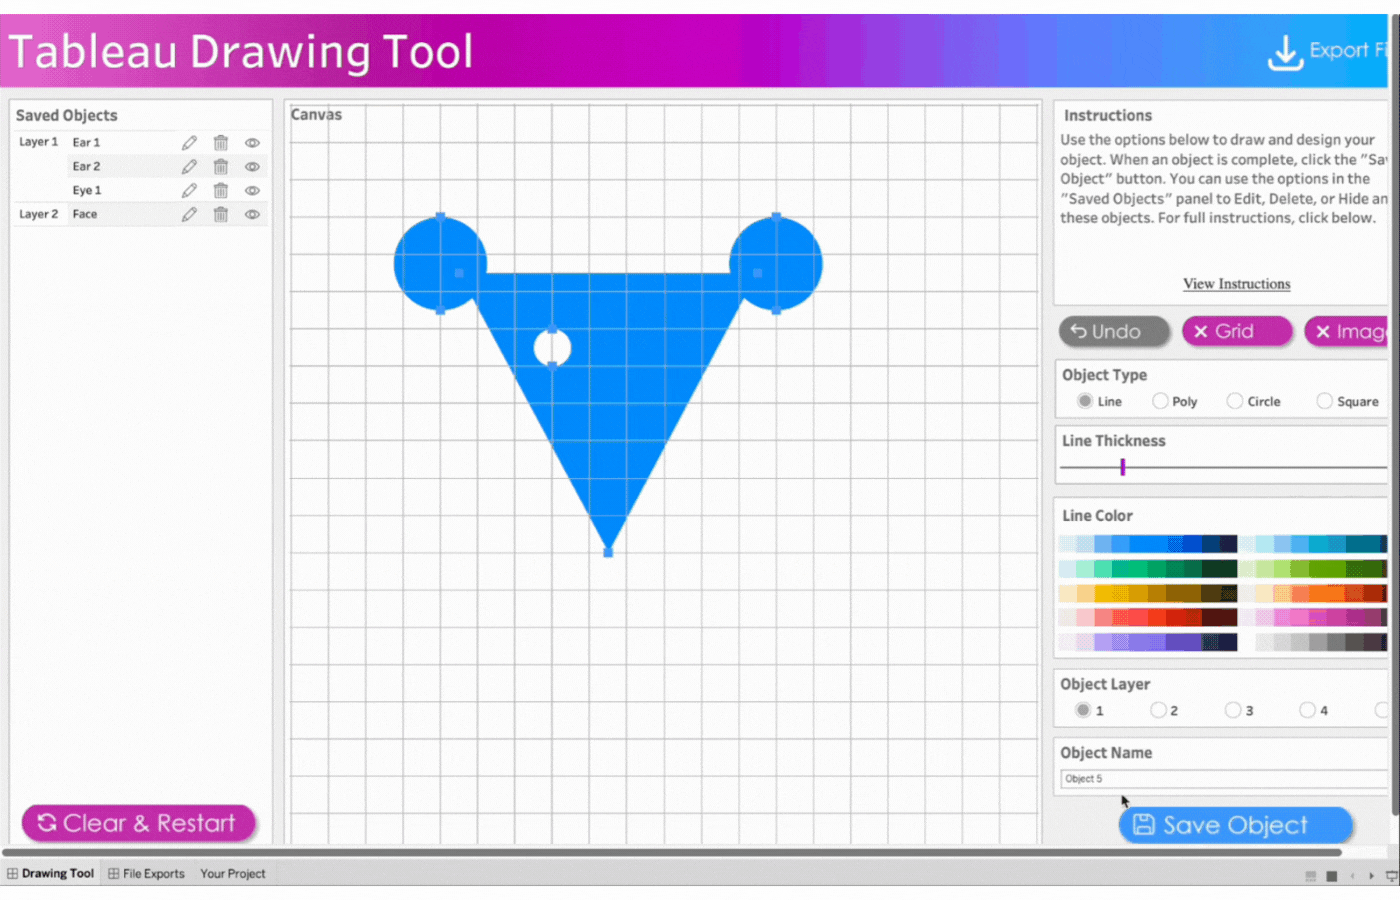
5. Create the first eye
- Name the object, Eye 1
- Select Object Layer 1 to have the eyes(circle) on the face(triangle)
- Click object type, Circle
- Click two points to determine the size of the circle
- Remove the border
- Select the color, white
- Save the object

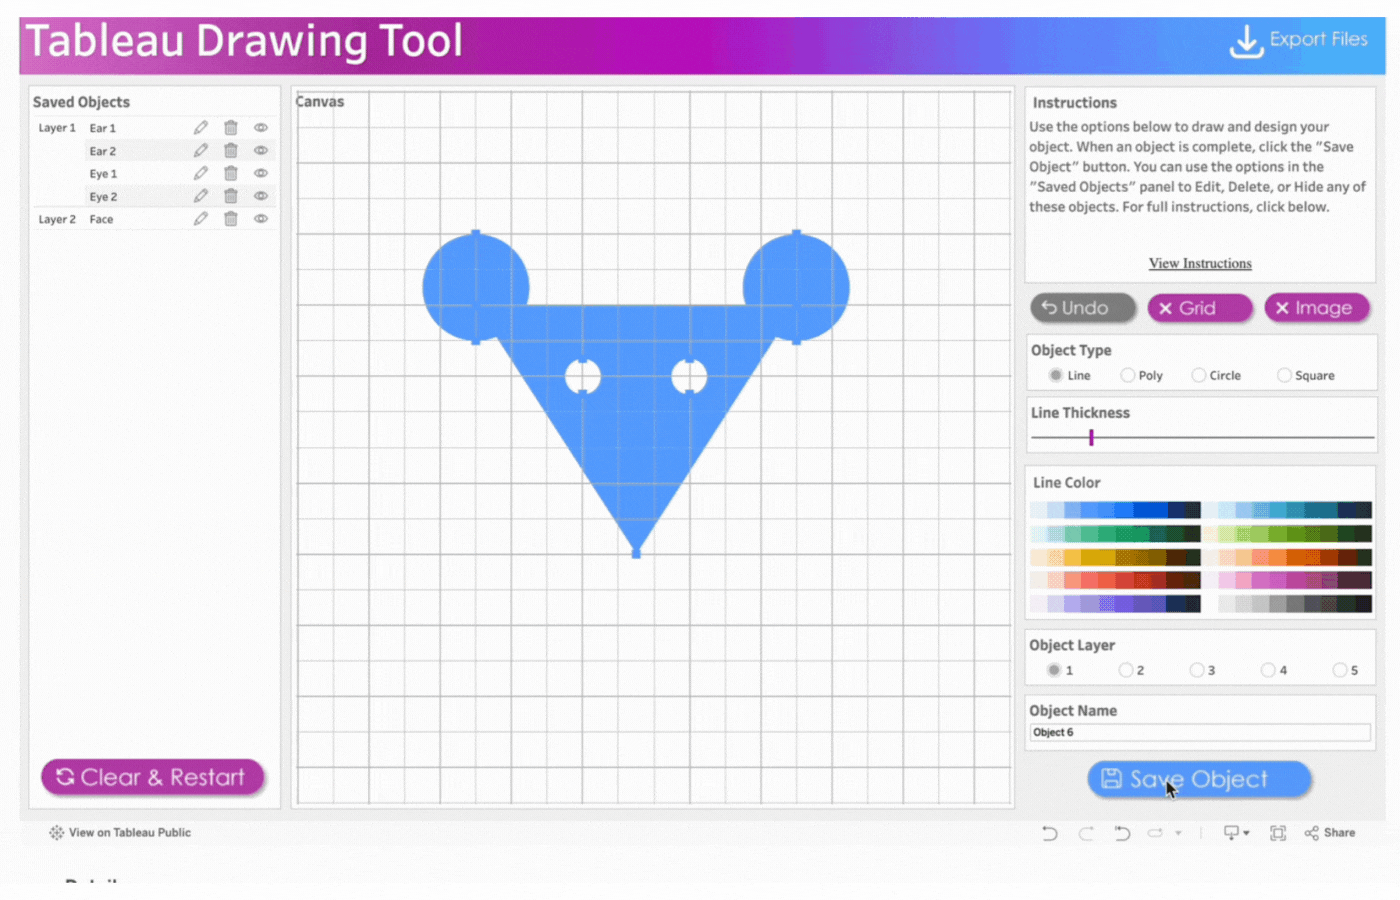
6. Create the second eye
- Name the object, Eye 2
- Repeat the process above for the second eye
7. Create the whiskers
- Name the object, Whiskers 1
- Click object type, Line
- Click two points to determine the length and angle of the whiskers
- Save the object
- Repeat this process for three more whiskers. Remember the name and save the objects.
8. Export the project by clicking the Export button
- Here, you can download all design files including; a data export (with everything needed to replicate this design in a new workbook), color palettes, calculations, and a project string that can be reused.
HOW TO DRAW WITH TABLEAU DESKTOP
This section of the documentation gives you a step-by-step guide on how to draw a little mouse using Tableau Desktop.

NB: This section only covers how to draw using Tableau Desktop. More sections in this documentation include:
- How to Draw with Tableau Public
- How to Export Images
- How to Save and Resume Your Work
- How to Trace a Web-hosted Image
STEPS
- Download the workbook
- Open the workbook on your local computer
- Create the first ear
- Create the second ear
- Create the face
- Create the first eye
- Create the second eye
- Create the whiskers
- Export the project by clicking the Export button
1. Download the workbook
- Click this link to access the Tableau Drawing Tool on Tableau Public: https://public.tableau.com/app/profile/brian.moore7221/viz/TableauDrawingTool/DrawingTool
- Download the Tableau Drawing Tool workbook
- Open the workbook on your local Tableau Desktop software. If you do not have the software on your local computer, download it from Tableau’s website.
2. Open the workbook on your local computer
- Open the downloaded workbook
- Switch to the presentation screen to view the entire drawing tool
- Alternatively, adjust the size or scroll down to view the entire drawing tool
- Close the Menu to open the drawing Canvas and begin
3. Create the first ear
- Name the first object, Ear 1
- Click object type, Circle
- Click two points to determine the size of the circle
- Remove the border
- Select the color, blue
- Save the object
4. Create the second ear
- Name the object, Ear 2
- Repeat the process above for the second ear
5. Create the face
- Name the object, Face
- Select Object Layer 2 to send the triangle behind the circles (ears)
- Click object type, Line
- Click three points to form a triangle
- Change object type to Polygon by clicking on Poly
- Remove the border
- Select the color, blue
- Save the object
6. Create the first eye
- Name the object, Eye 1
- Select Object Layer 1 to have the eyes(circle) on the face(triangle)
- Click object type, Circle
- Click two points to determine the size of the circle
- Remove the border
- Select the color, white
- Save the object
7. Create the second eye
- Name the object, Eye 2
- Repeat the process above for the second eye
8. Create the Whiskers
- Name the object, Whiskers 1
- Click object type, Line
- Click two points to determine the length and angle of the whiskers
- Save the object
- Repeat this process for three more whiskers. Remember the name and save the objects.

9. Save the project
- Save the drawing like you would any regular Tableau viz.
OPTIONAL
Observe that the workspace layout looks slightly different on Tableau Desktop compared to Tableau Public. Here are some differences to take note of:
- Drawing Tool Dashboard – This is where all drawings are made. It also houses hidden sheets to allow the drawing tool to function optimally.
- File Exports – This contains export information on your drawing. It also houses hidden sheets to allow the drawing tool to function optimally.
- Your Project – This is the worksheet where your final drawing appears. This can be saved on your Tableau Public profile.

HOW TO EXPORT DRAWINGS
This step is necessary when using Tableau Public to draw or trace images. It contains the metadata of your drawings and allows for easy replication or transfer. File Export is available for use in the Tableau Public or Desktop version of the Drawing Tool.
To export a drawing, take the following steps:
- Download the Tableau Workbook Template here https://public.tableau.com/app/profile/brian.moore7221/viz/TableauDrawingToolTemplate/TableauDrawingToolTemplate
- Click on the Export Files link at the top of the drawing tool
- Click the Export Files Button
- Select the ‘Export-Data’ file and choose CSV for the format image.png
- In the Tableau Workbook Template, edit the existing Data Source and connect it to the ‘Export-Data’ file you just downloaded
HOW TO SAVE AND RESUME YOUR WORK
To save and resume your work in Tableau Public, use the project string feature. Follow these steps to export and load your project string.
- Go to the Export Files page.
- Click the Export Files button.
- Select the Export-Project String file.
- To resume your design, open the Drawing Tool.
- Paste the entire string from the downloaded file into the Load Project box.
- Press Enter before closing the menu.
HOW TO TRACE AN IMAGE FROM THE WEB
To trace an image from the web, start by selecting the image you wish to trace. Load the image to the Tableau Drawing Tool and trace it as you would in traditional image tracing.

STEPS
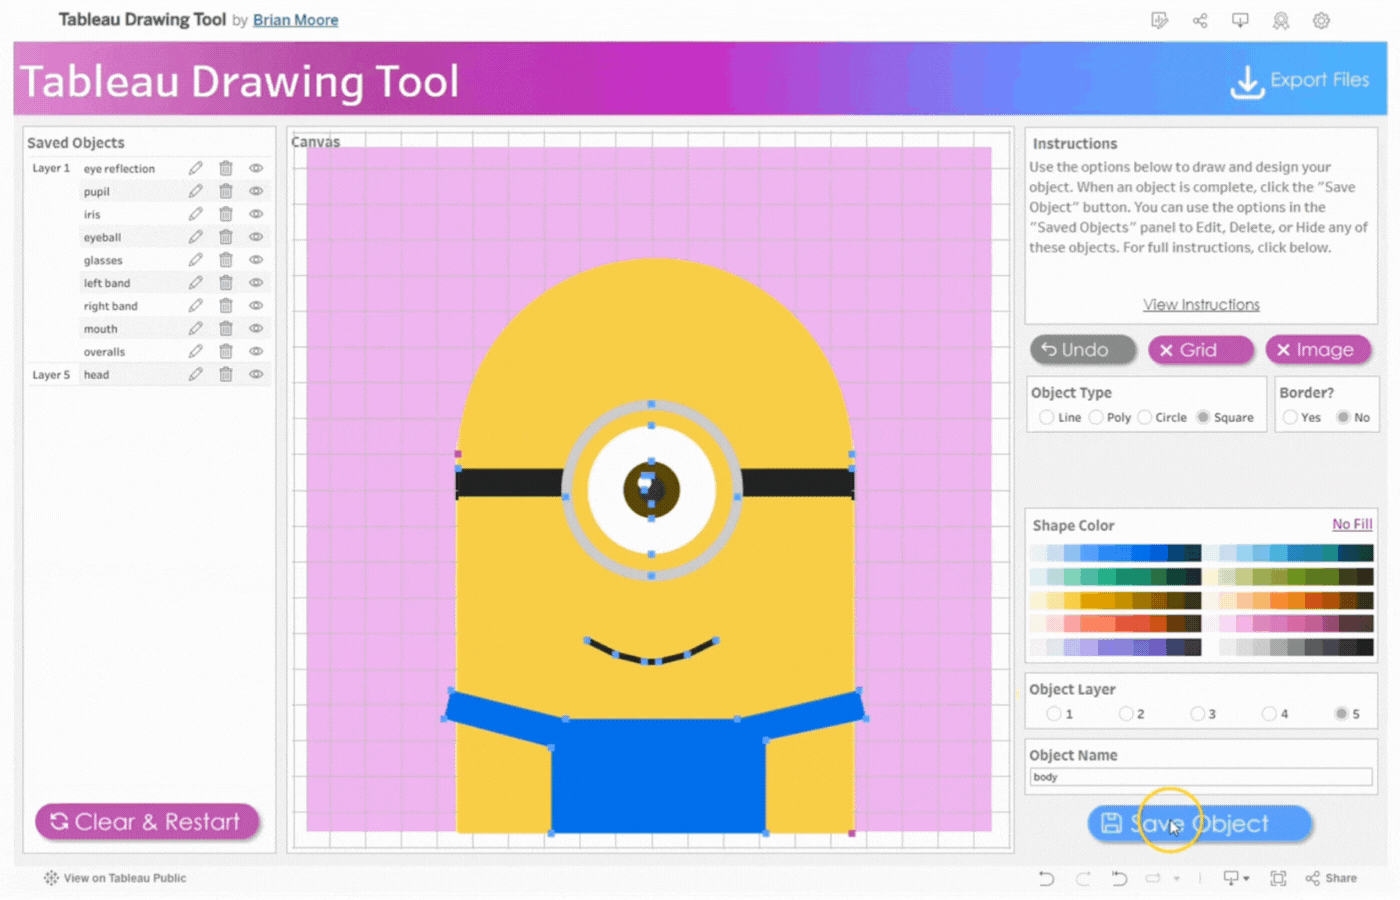
- Select a minion image on the web
- Create the Eye Reflection
- Create the Pupil
- Create the Iris
- Create the Eyeball
- Create the Glasses
- Create the Left band
- Create the Right band
- Create the Mouth
- Create the Overalls
- Create the Head
- Create the Body
- Create the Background
1. Select a minion image on the web
- Search for a minion image
- Copy the image address
- Open the Tableau drawing tool: https://public.tableau.com/app/profile/brian.moore7221/viz/TableauDrawingTool/DrawingTool
- Paste the link on the Image Link box
- Click the button, Close Menu to Begin

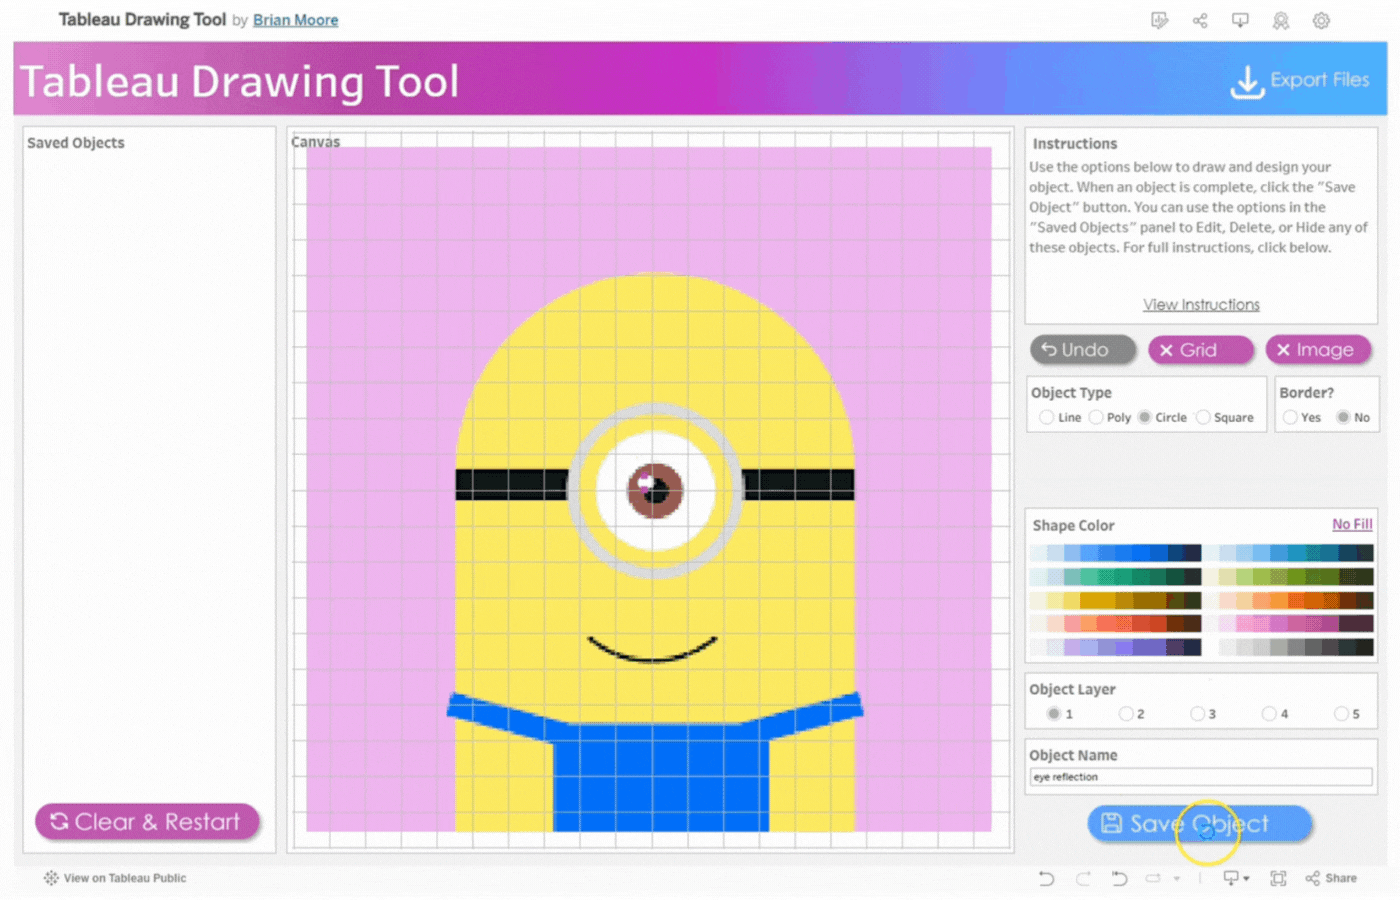
2. Create the Eye Reflection
- Click object type, Circle
- Remove the border
- Click two points to determine the size of the circle
- Select the color, white
- Name the first object, Eye reflection
- Save the object

Create the Pupil
- Repeat the process above for the Pupil
- Select the color, black
- Name the object, Pupil
- Save the object
Create the Iris
- Repeat the process above for the Iris
- Select the color, brown
- Name the object, Iris
- Save the object

Create the Eyeball
- Repeat the process above for the Eyeball
- Select the color, brown
- Name the object, Eyeball
- Save the object

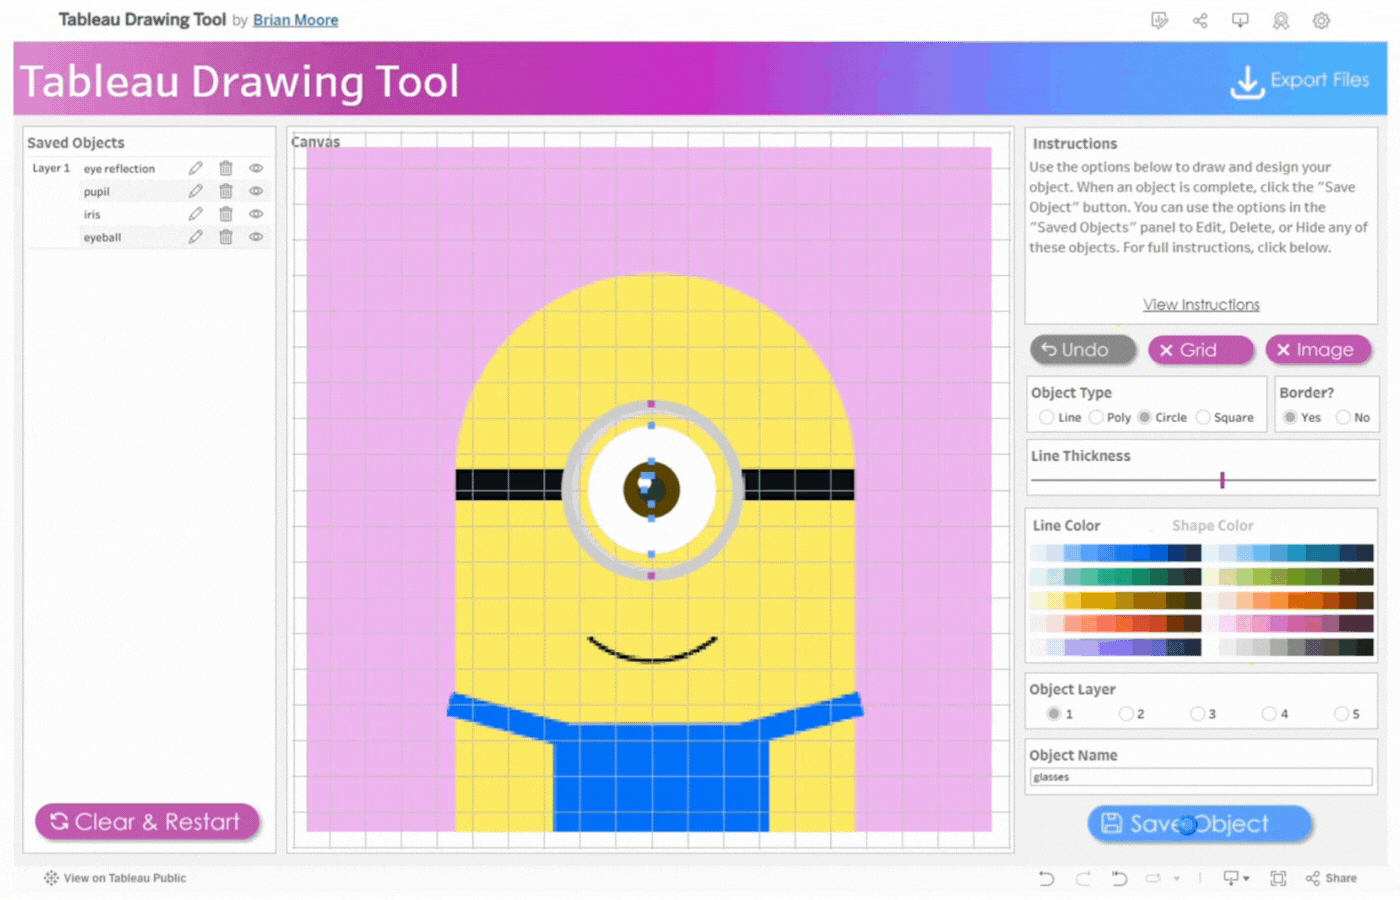
Create the Glasses
- Click object type, Circle
- Remove the border
- Click two points to determine the size of the circle
- Add the border
- Click on No Fill
- Select the color, Grey
- Increase Line Thickness
- Change Line Color to Grey
- Name the object, Glasses
- Save the object

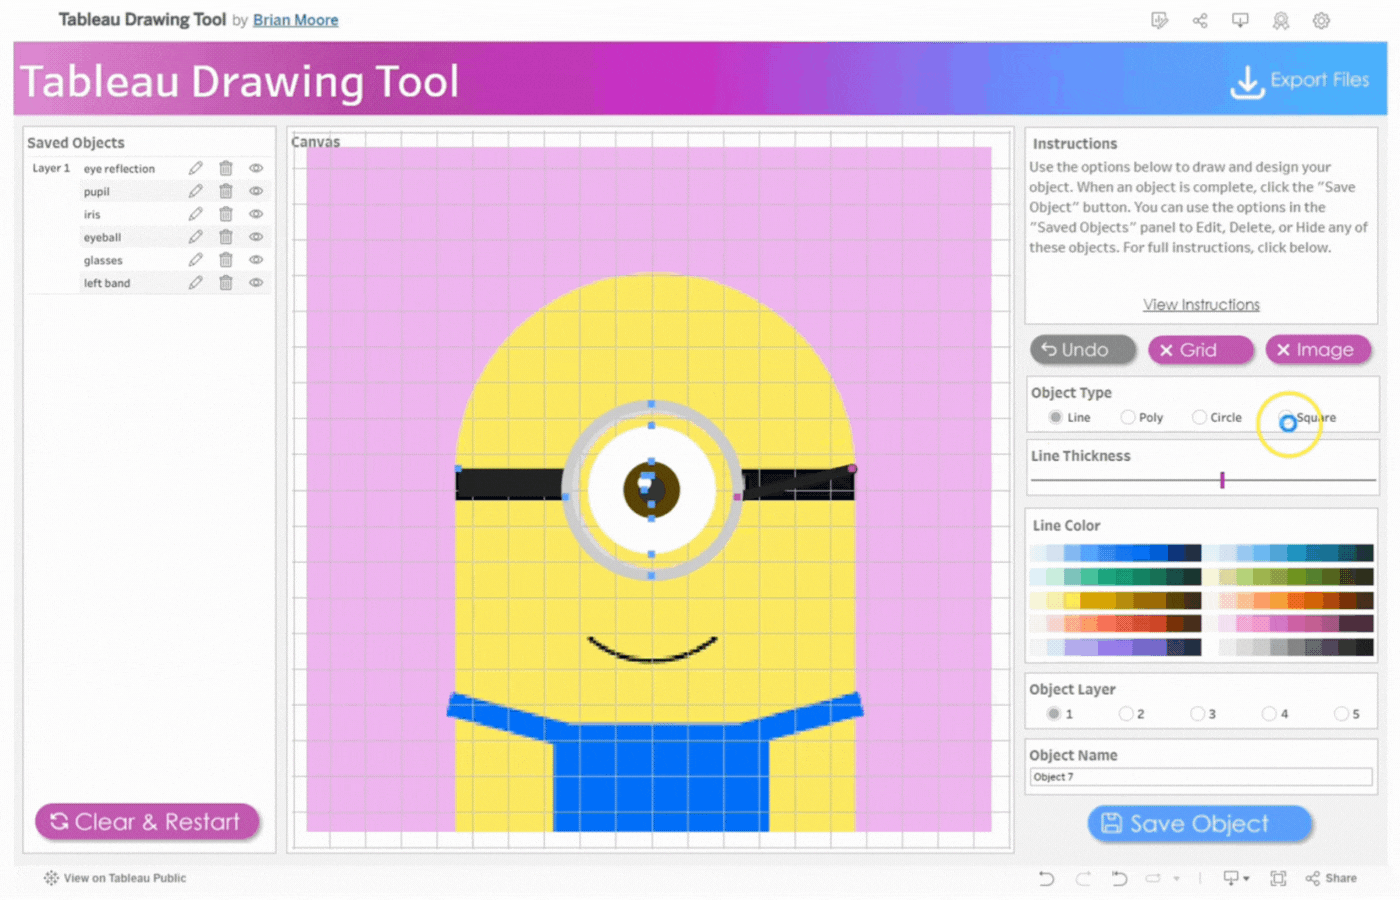
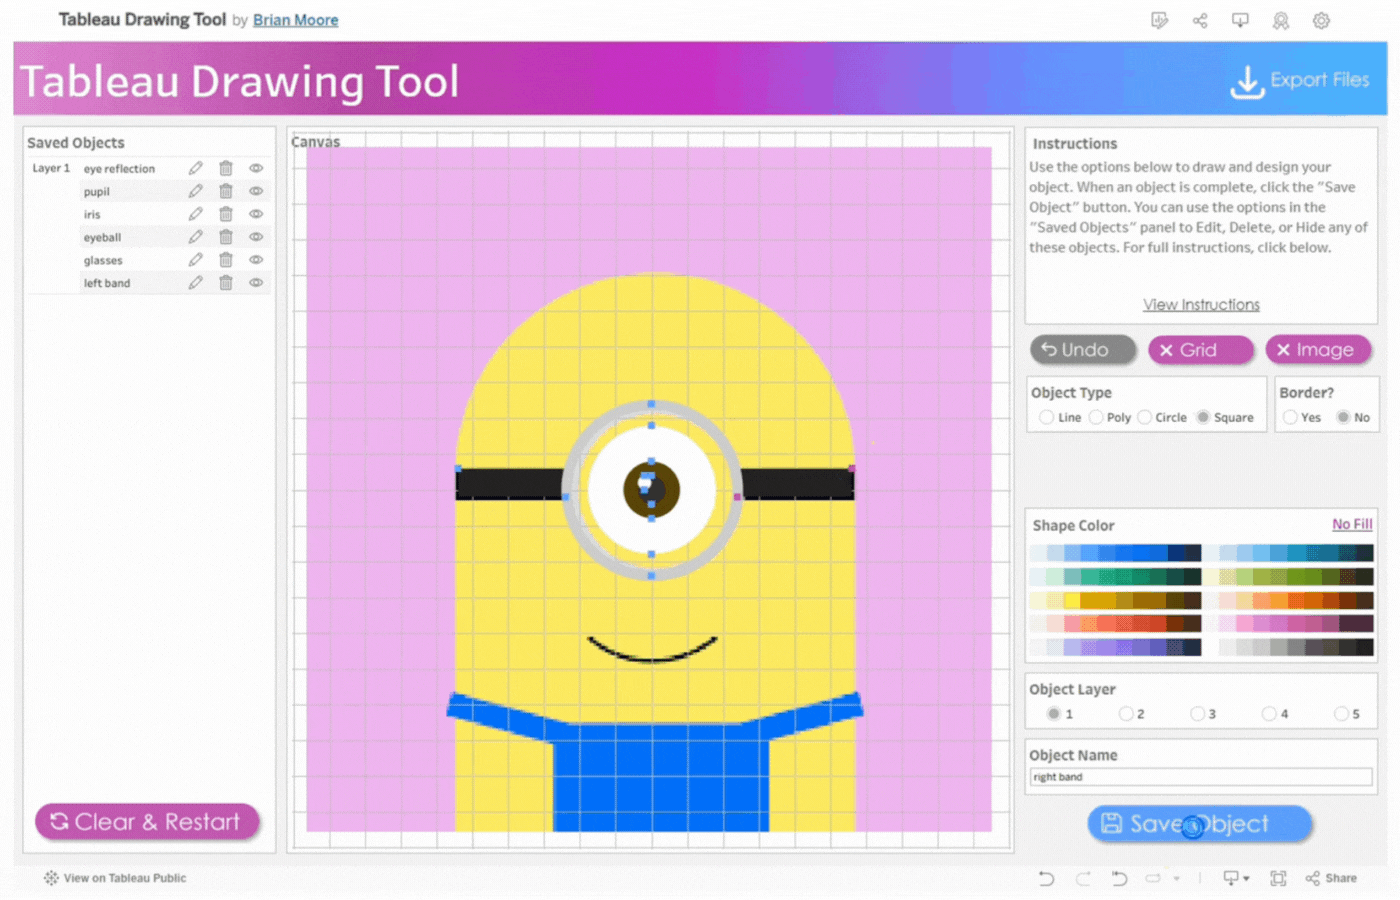
Create the Left band
- Click object type, Square
- Click two points from top left to bottom right to determine the size of the square
- Remove the border
- Name the object, Left band
- Save the object
Create the Right band
- Click object type, Square
- Click two points from top right to bottom left to determine the size of the square
- Remove the border
- Name the object, Right band
- Save the object
Create the Mouth
- Click object type, Line
- Reduce Line Thickness
- Select a sequence of points to determine the length of the mouth
- Name the object, Mouth
- Save the object
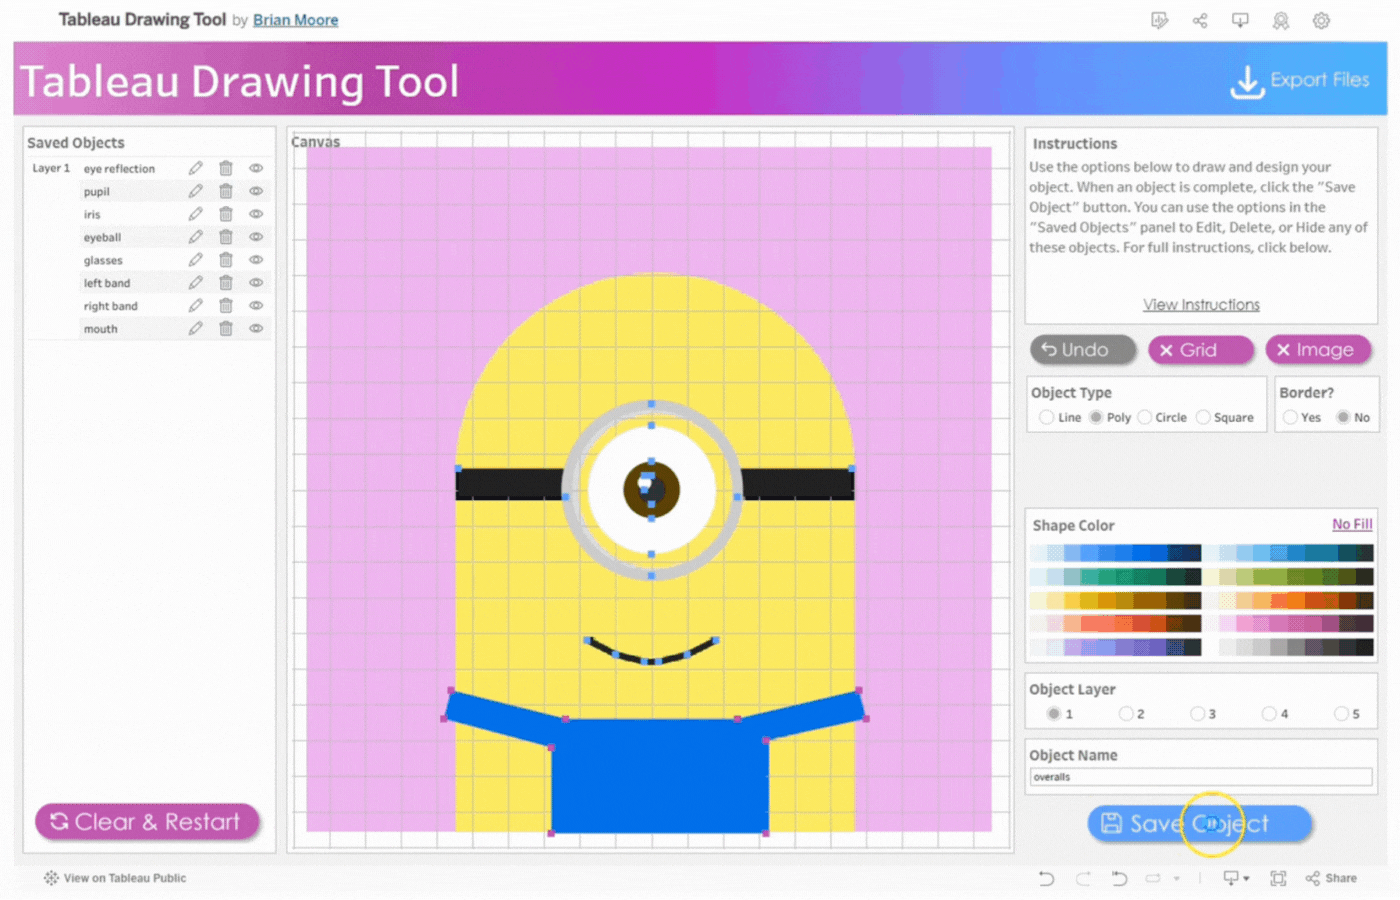
Create the Overalls
- Click object type, Line
- Select a sequence of points to trace out the overalls of the minion
- Change object type to Poly
- Remove the border
- Select the color, blue
- Name the object, Overalls
- Save the object

Create the Head
- Click object type, Circle
- Click two points to determine the size of the circle
- Select the color, yellow
- Remove the border
- Select Object Layer 5 to send the circle behind
- Name the object, Head
- Save the object
Create the Body
- Click object type, Square
- Click two points from top left to bottom right to determine the size of the square
- Remove the border
- Select the color, yellow
- Name the object, Body
- Save the object

Create the Background
- Click object type, Square
- Click two points from top left to bottom right of the Canvas to determine the size of the square
- Remove the border
- Select the color, pink
- Select Object Layer 5
- Name the object, Background
- Save the object